




15 Sep 2026


FortiNAC is a powerful product that ensures network security by blocking unauthorized devices from gaining network access or only allowing them access after they have been classified. The official documentation could be improved when it comes to configuring FortiNAC as a RADIUS server for 802.1X EAP-TLS and MAC authentication, and this article addresses this exact issue, for both 7.6.6 and 7.6.7.
By the end of this article, FortiNAC will be ready to process RADIUS requests for 802.1X and MAC authentication requests for both wired and wireless devices from Fortinet and third-party switches and access points, while providing VLAN assignements.
The setup
- FortiNAC running 7.6.6 and 7.6.7
- FortiGate 70G running 7.6.7
- FortiSwitch 424E running 7.6.6 (managed)
- FortiAP 241K running 7.6.5 (managed)
- Aruba-CX 6000
- Aruba IAP 505
FortiNAC has a complete base setup that can be managed via the GUI. FortiSwitch and FortiAP are already integrated into FortiGate; there are VLANs on the FortiLink interface, and a tunnel SSID.
The Aruba devices are completely standalone, and the switch has its own uplink with VLANs.
Important: This article started with FortiNAC 7.6.6, but while writing, 7.6.7 was released and introduced the RADIUS-only devices feature. At the end of this article is a section dedicated to 7.6.7 and how to configure the new RADIUS-only feature.
Importing certificates
Because 802.1X is configured with EAP-TLS, two certificate-related tasks must be completed first. FortiNAC requires a certificate for the local RADIUS server, so clients can validate FortiNAC, and a trusted CA certificate must be imported so that FortiNAC trusts the client certificates.
The trusted CA certificates can be imported in Settings -> Certificate Management in the "Trusted Certificates" tab using “Upload Certificate“. It is important that the “Certificate Target” is selected as the “RADIUS Endpoint Trust [radius]“.

In the same menu, you can import the RADIUS server certificate or generate a CSR using the "Server Certificates“ tab.
The "Certificate Target“ in this case is “Local RADIUS SERVER (EAP) [radius]“.

Enable RADIUS
First, RADIUS must be enabled as a service on the port1 interface of FortiNAC. This is done on the CLI, where both RADIUS authentication as well as accounting are enabled.
config system
    interface
        edit port1
            append allowaccess radius-auth radius-acct
        next
    end
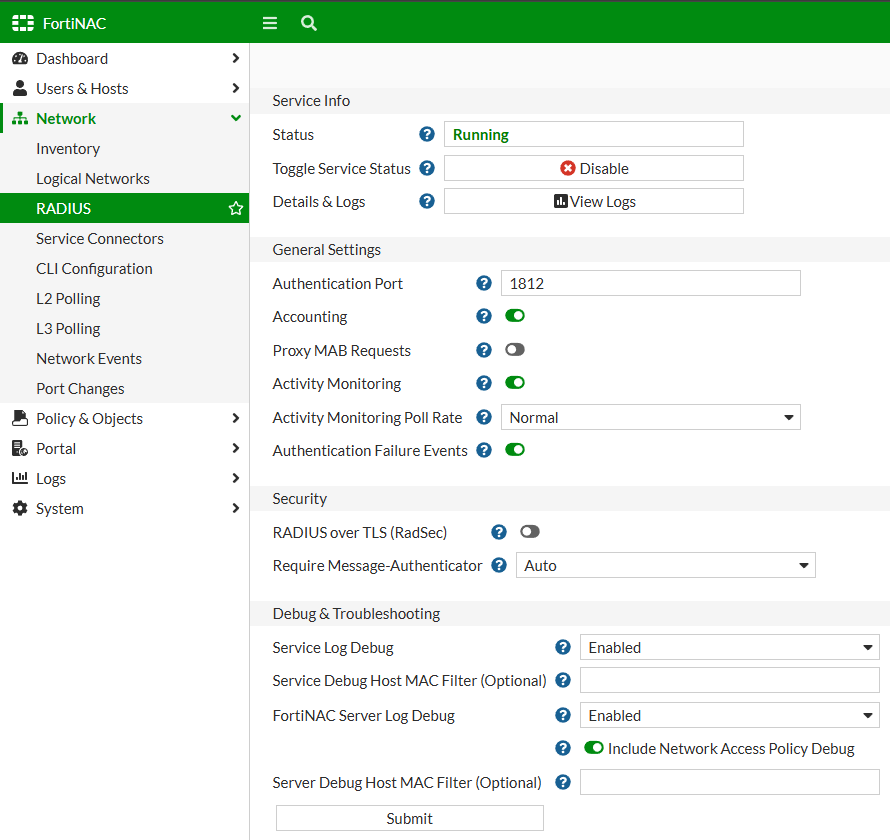
The local RADIUS service is not activated by default, and this can be changed in Network -> RADIUS.
Here's what to do:
- Toggle Service Status: Click so the RADIUS service status switches to "Running“
- Accounting: Can be activated if RADIUS accounting is going to be configured later
- Activity Monitoring: Active
- Authentication Failure Events: Active
- Require Message-Authenticator: Auto, which provides the best compatibility
- Service Log Debug: Enabled
- FortiNAC Server Log Debug: Enabled
- Include Network Access Policy Debug: Active
With these options selected and a click on "Submit“, the RADIUS service is configured.
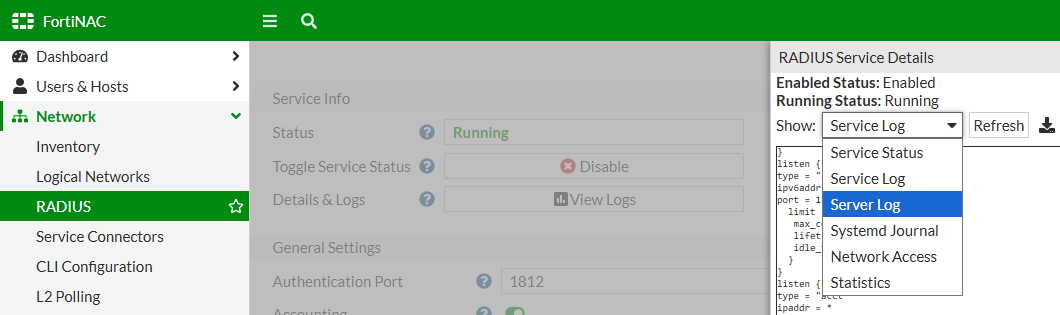
In this menu, you can use "View Log“ to open the RADIUS logs to see how RADIUS requests are being processed. The options available are "Service Log“ and "Server Log“, I recommend primarily using the “Server Log” option, because it gives the most information and is best for troubleshooting.
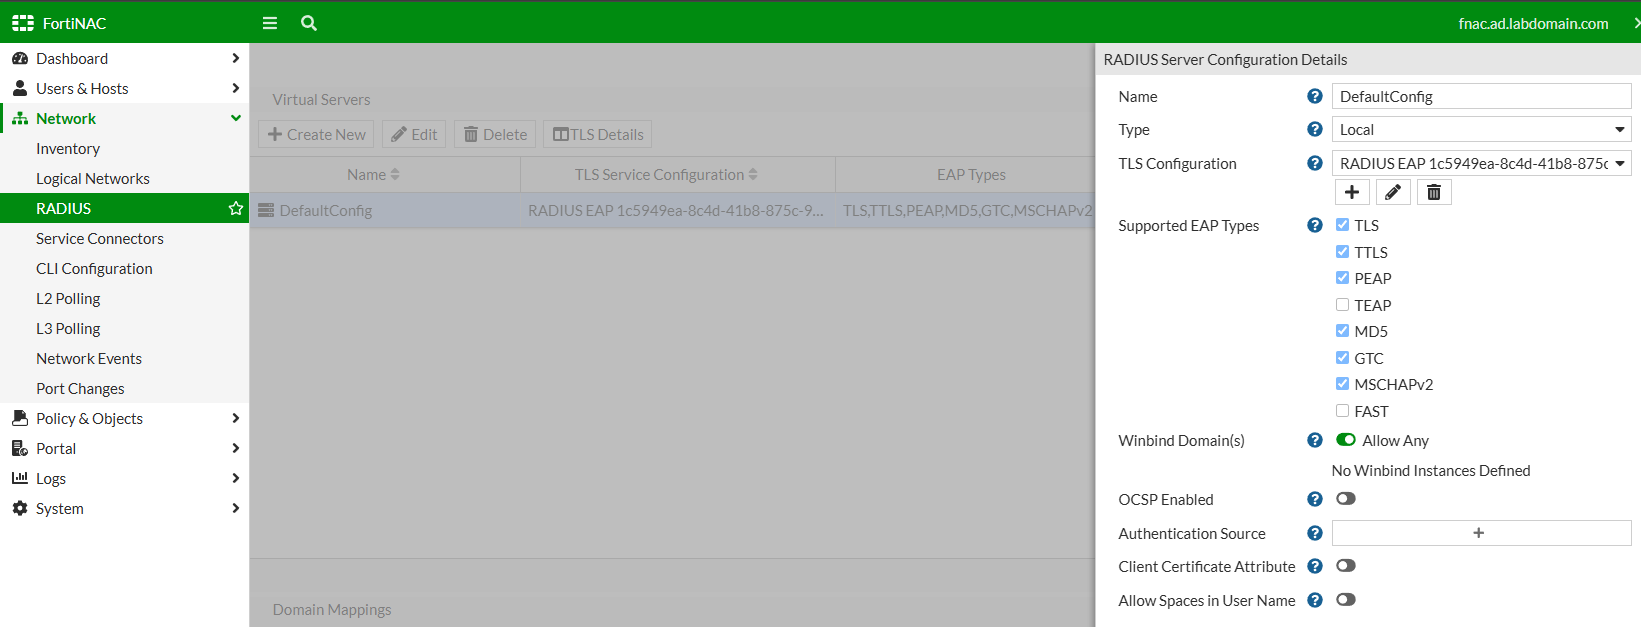
A virtual server configuration is also required, which is created on the "Virtual Servers“ tab. A virtual server is a RADIUS server configuration that determines which certificate is used for the server and which EAP methods are allowed.
A new virtual server can be added, or you can use the DefaultConfig entry.
The following setting are important in the configuration:
- Type: Local, because it is a local RADIUS server.
- TLS Configuration: The previously imported certificate can be chosen using the pencil button.
- Supported EAP Types: It is important that at least TLS is selected.
Roles and Hosts
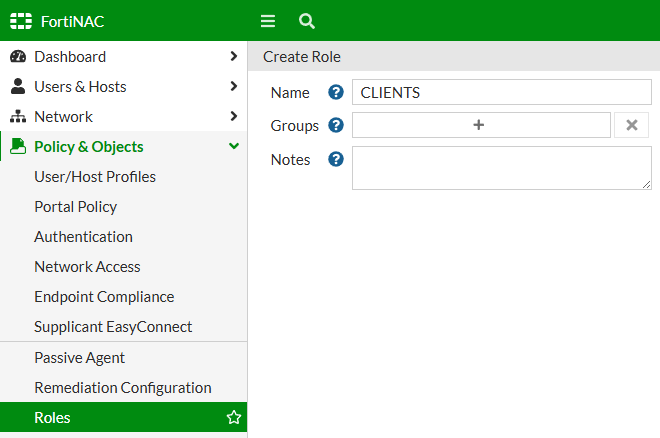
To ensure that hosts can later be correctly recognized for MAC authentication, we need to create roles and assign them to hosts.
Roles are created in Policy & Objects -> Roles, and a name is enough. I created the role “CLIENTS”.
Once a MAC address is recognized by FortiNAC, an adapter with that MAC address and a host are created in Users & Hosts. This host can then be assigned a role in the Hosts menu.
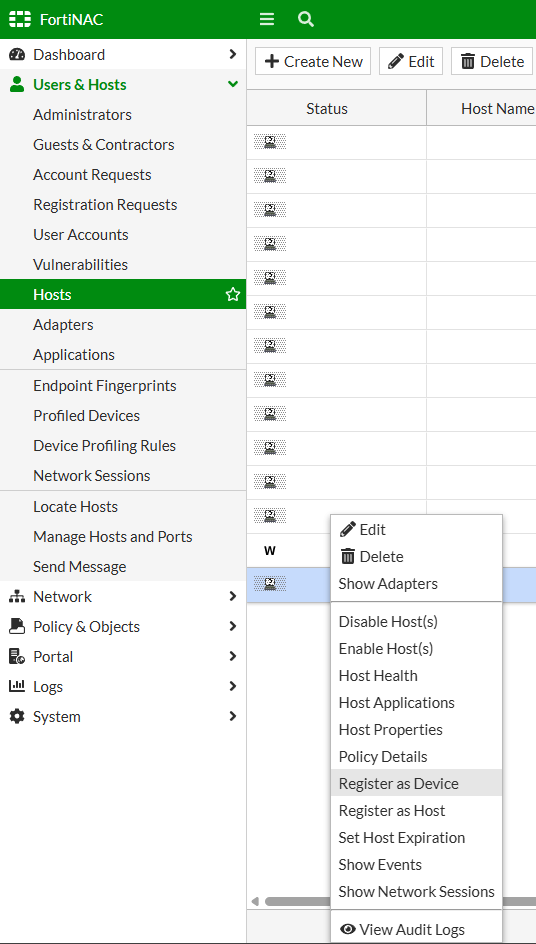
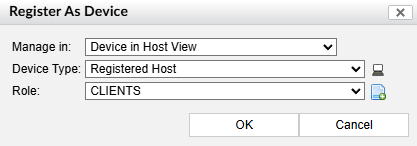
You can, of course, also import hosts, or MAC addresses and assign a role immediately. This works by using a CSV file and the “Import” button in the Hosts menu. An example CSV file can look like the following:
00:11:22:33:44:55,CLIENTS
11:22:33:44:55:66,CLIENTS
Logical Networks as a link
In FortiNAC, Logical Networks are some of the most important objects. They link configurations and ultimately return the result of an authentication. They are configured in Network -> Logical Networks, where you simply need to give a name. I am adding the logical network "CLIENTS“.
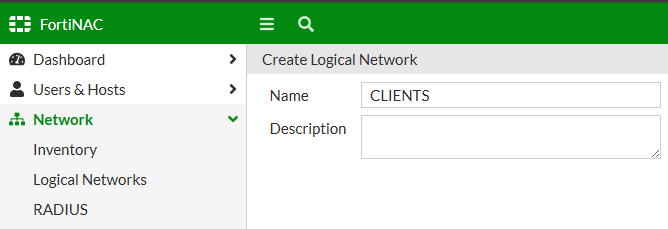
This object will later be used in the Network Access section as a configuration, and in the device Model Configuration it will be assigned to an Access Value.
User/Host Profiles as the logic
In Policy & Objects -> User/Host Profiles, rules are created to filter authentication requests using attributes so the correct result can later be returned.
In these profiles, there are two attribute groups:
- Attributes: These are FortiNAC-specific attributes, like the host status, the adapter type or the authentication method.
- RADIUS Attributes: These are generic RADIUS attributes that can work with any attributes.
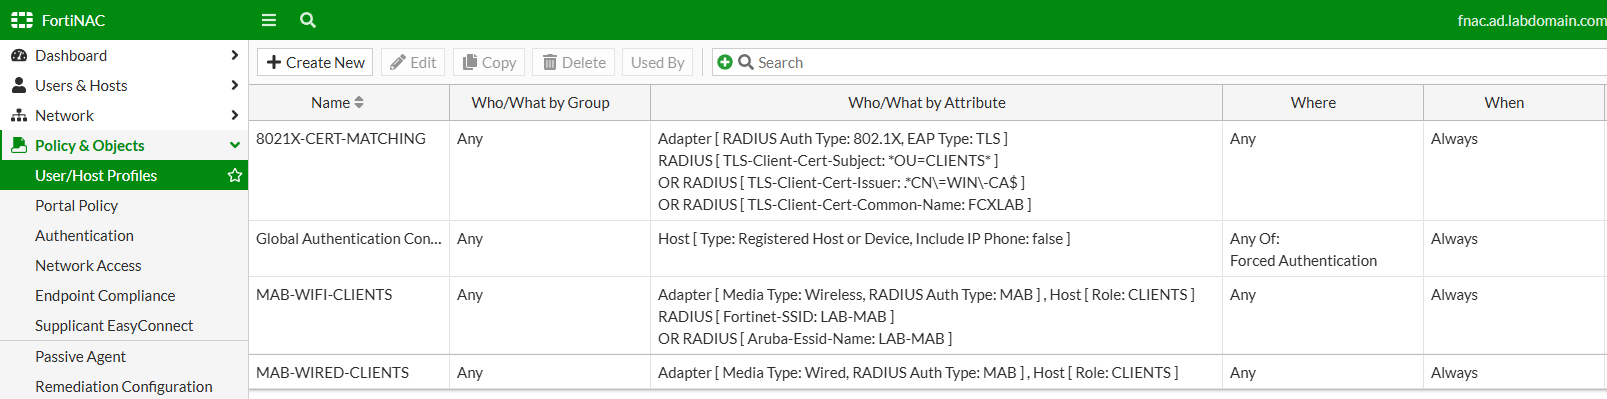
For this article, I will create three profiles:
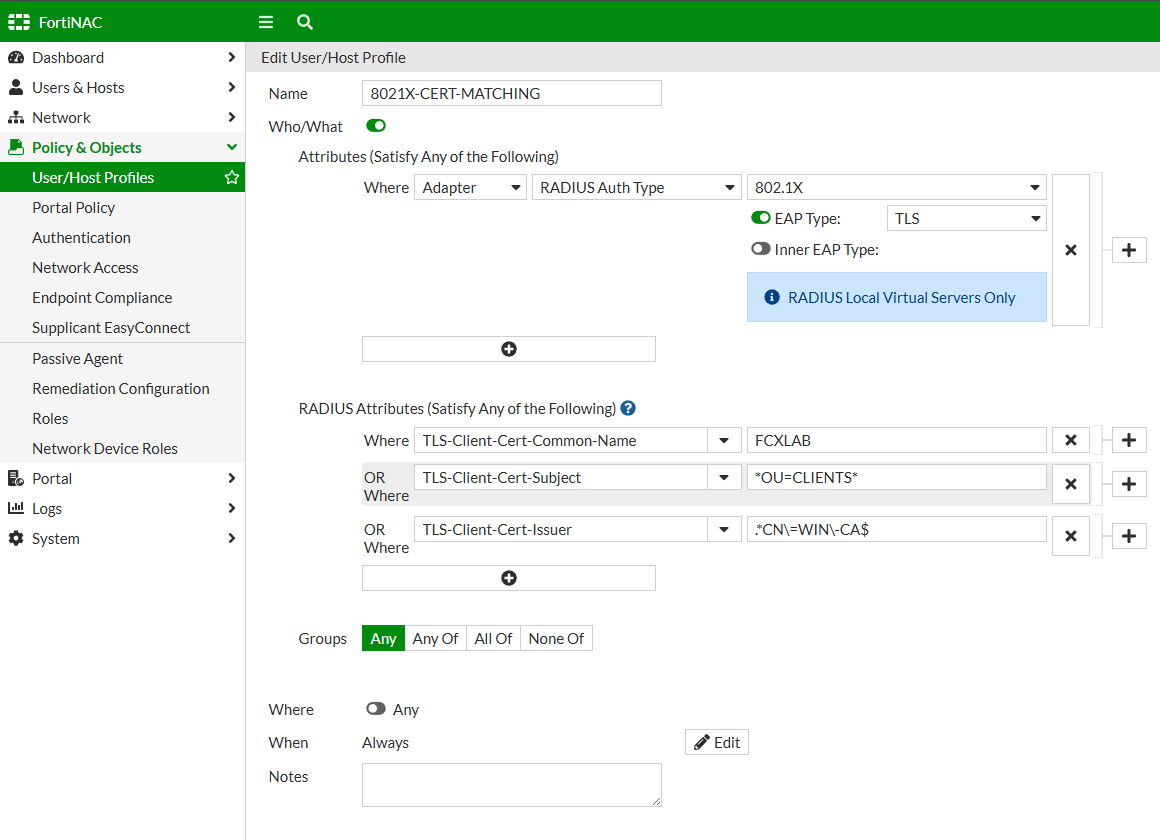
- 8021X-CERT-MATCHING with 4 filtering rules:
1.1. A standard Attribute rule that checks if the request is an 802.1X EAP-TLS request.
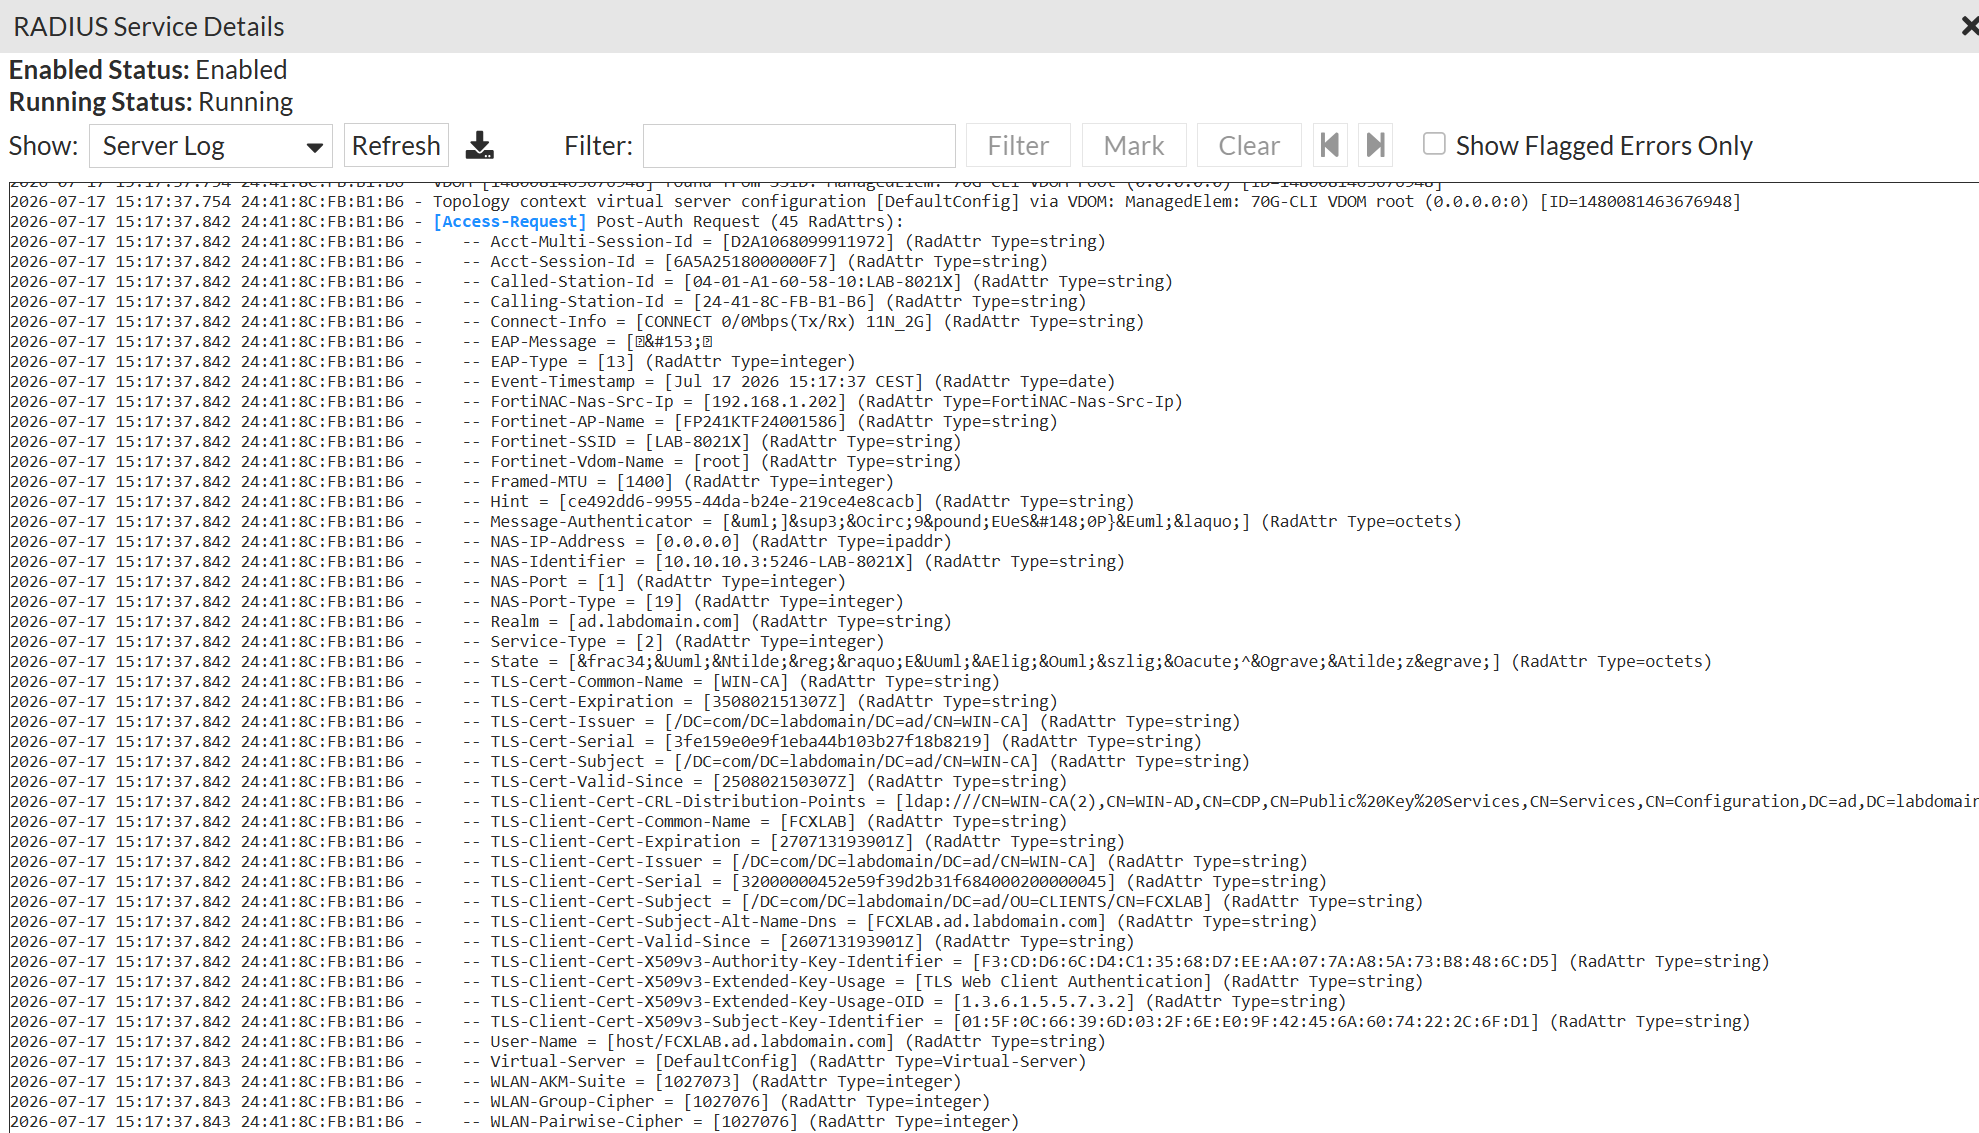
1.2. Three RADIUS Attribute rules that use simple, wildcard and regex to check information in a certificate. These rules primarily exist to show the possibilities. In a production system, the rules with "TLS-Client-Cert-Subject“ and "TLS-Client-Cert-Issuer“ would be enough. These certificate fields and all other RADIUS attributes of a request are visible in the RADIUS Server Log once a RADIUS request is sent to FortiNAC.
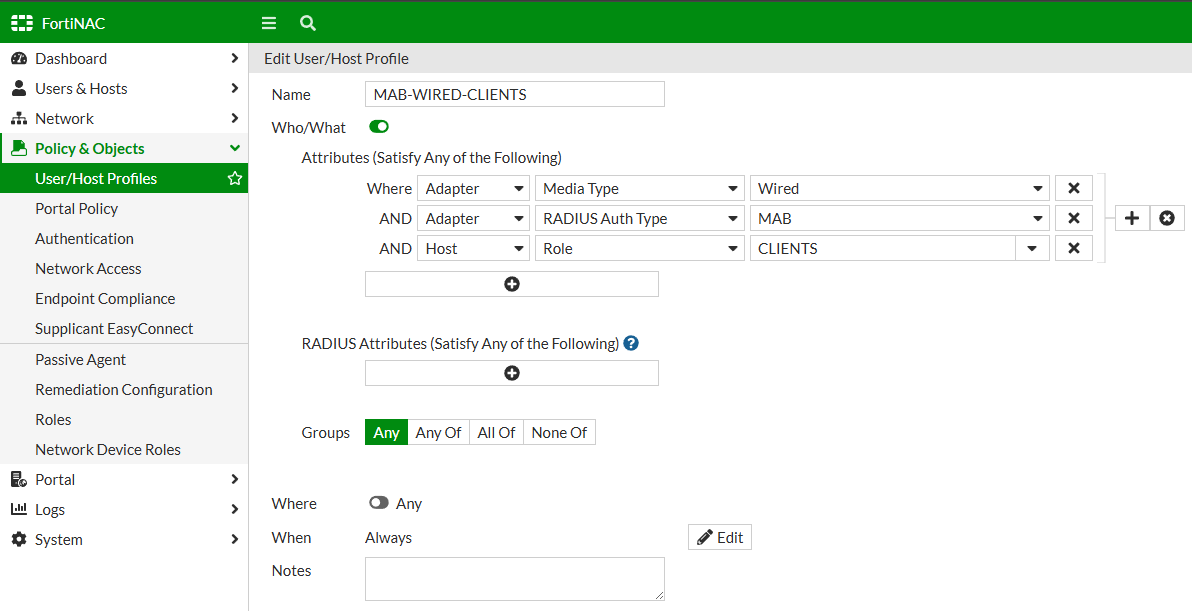
2. MAB-WIRED-CLIENTS with 3 filter rules:
2.1. Does the request come from a wired adapter?
2.1.1. This rule could also be created using the RADIUS attribute “NAS-Port-Type” with a value of 15.
2.2. Is it a MAC Authentication Bypass (MAB) request?
2.3. Is the host, effectively the MAC address, assigned the role “CLIENTS”?
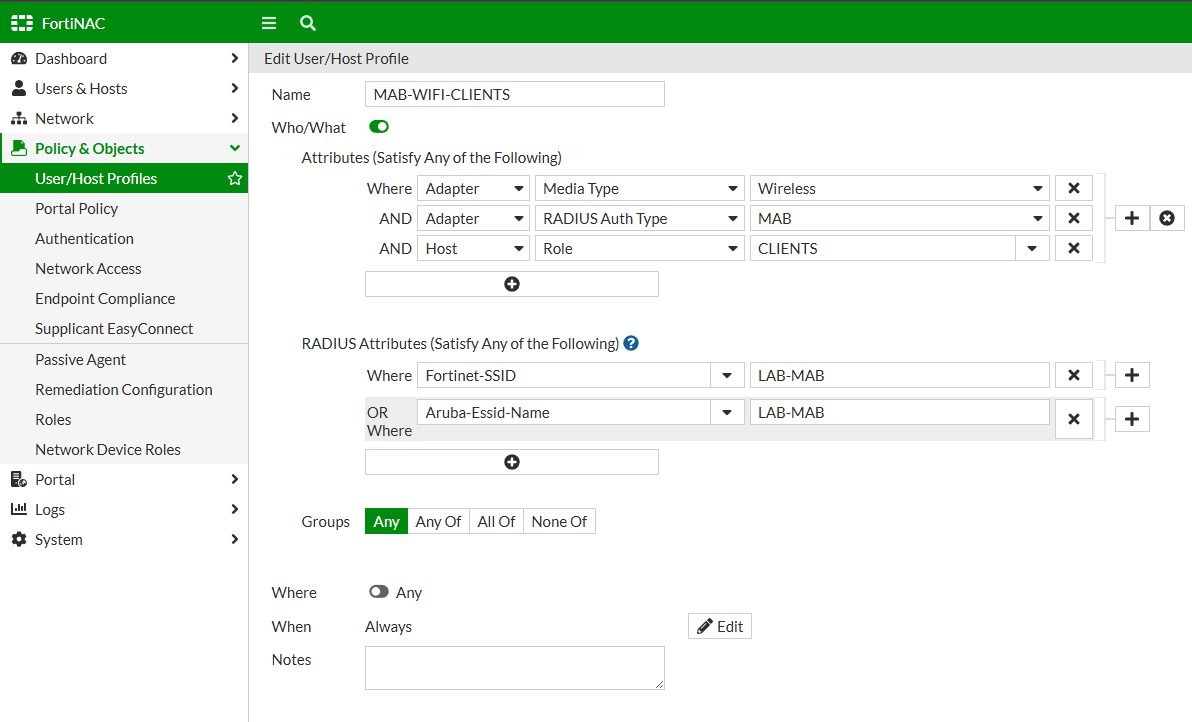
3. MAB-WIFI-CLIENTS with 5 filtering rules:
3.1. Does the request come from a wireless adapter?
3.1.1. This rule could also be created using the RADIUS attribute “NAS-Port-Type” and a value of 19.
3.2. Is it a MAC Authentication Bypass (MAB) request?
3.3. Is the host, effectively the MAC address, assigned the role “CLIENTS”?
3.4. Does the request come from a FortiAP with the SSID “LAB-MAB”? OR
3.5. Does the request come from an Aruba AP with the SSID “LAB-MAB”?
With this, I have the following profiles that are ready to be used further.
Network Access for enforcement
In Policy & Objects -> Network Access, you configure settings that include logical networks and link them to User/Host profiles. This combination, called a policy, determines the enforcement settings, meaning which RADIUS attributes are being sent to the switch or access point.
In the tab "Configurations" I create a Network Access Configuration, which needs a name and a logical network.
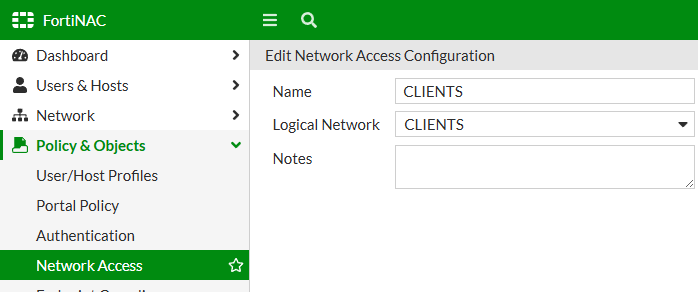
In the "Policies“ tab, I now create my three Network Access Policies, where I supply a name, a configuration and a User/Host profile for each.
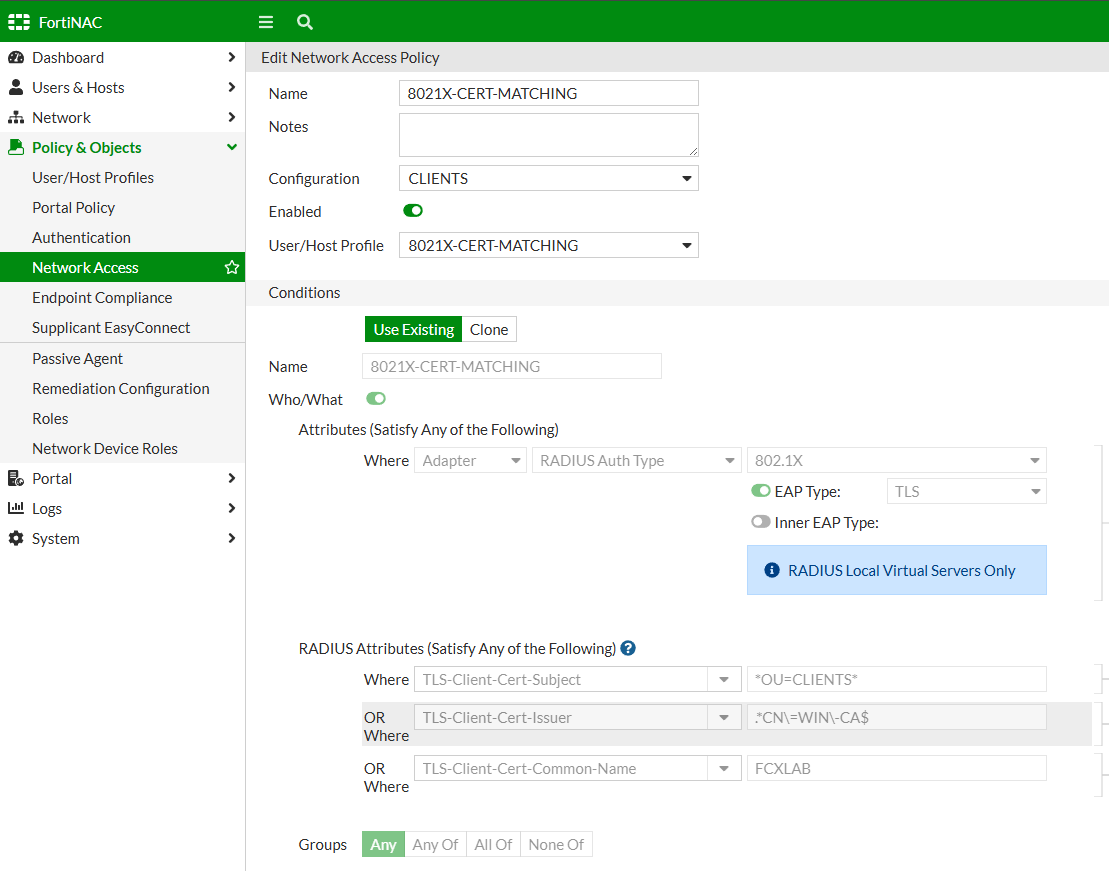
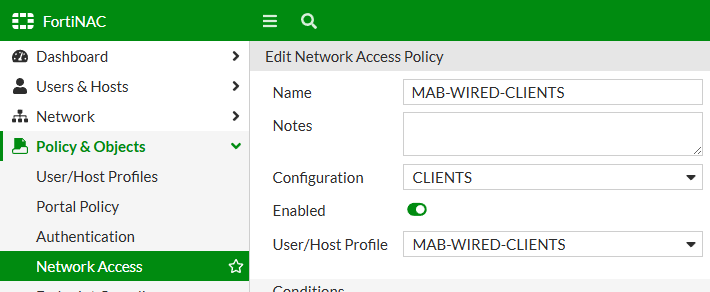
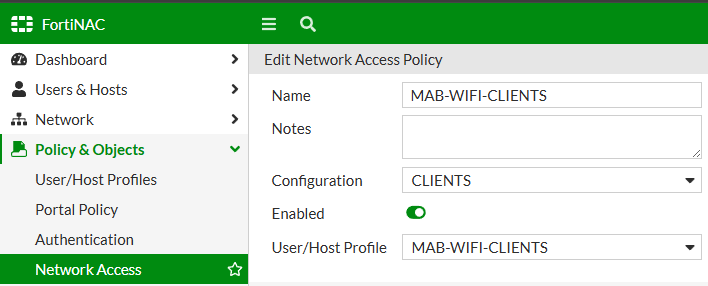
The order of the network access policies is important because they are processed from top to bottom, but there can be no overlap between the three.
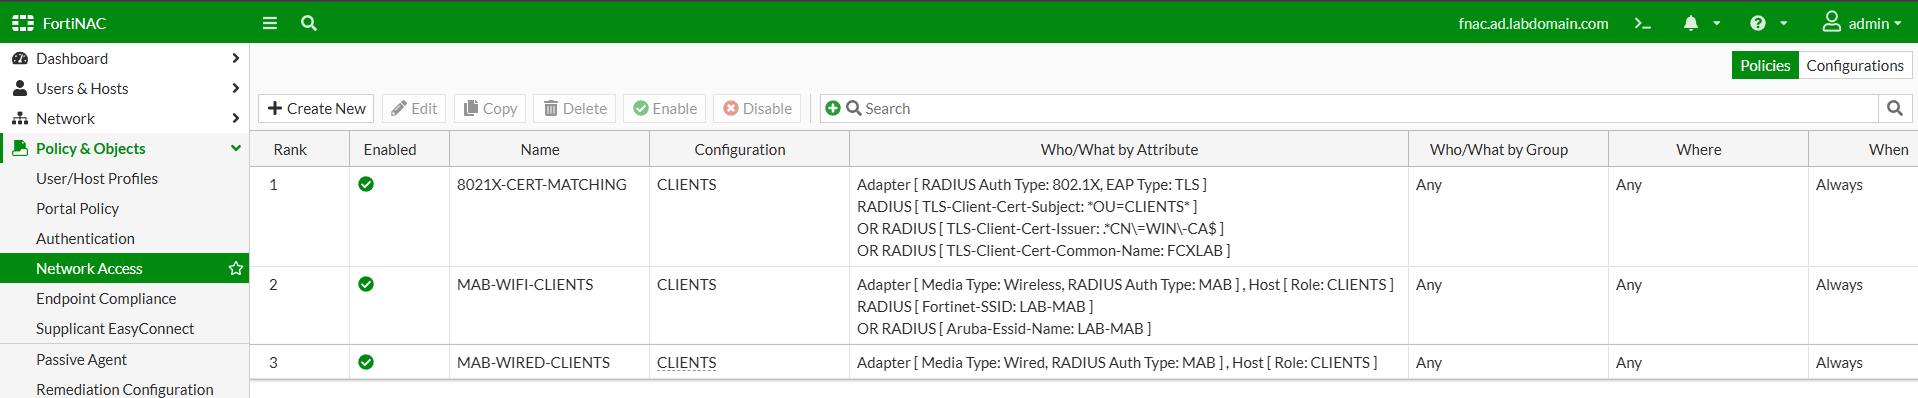
Now only devices are missing, and these will be created and configured now.
Model Devices: FortiGate
Devices in FortiNAC include the configuration specifying how ports and SSIDs should be handled and the so-called Model Configuration, which defines the mapping of logical networks to VLANs. The devices will primarily be integrated using SNMP, and for additional functionality, API keys or CLI access via SSH can be configured.
We start with a FortiGate, which requires an SNMP configuration (in my case SNMPv3) and a REST API administrator along with its API key. The REST API administrator should have FortiNAC’s IP as its only Trusted Host and a super_admin profile. Do not forget to enable SNMP on the correct FortiGate interface.
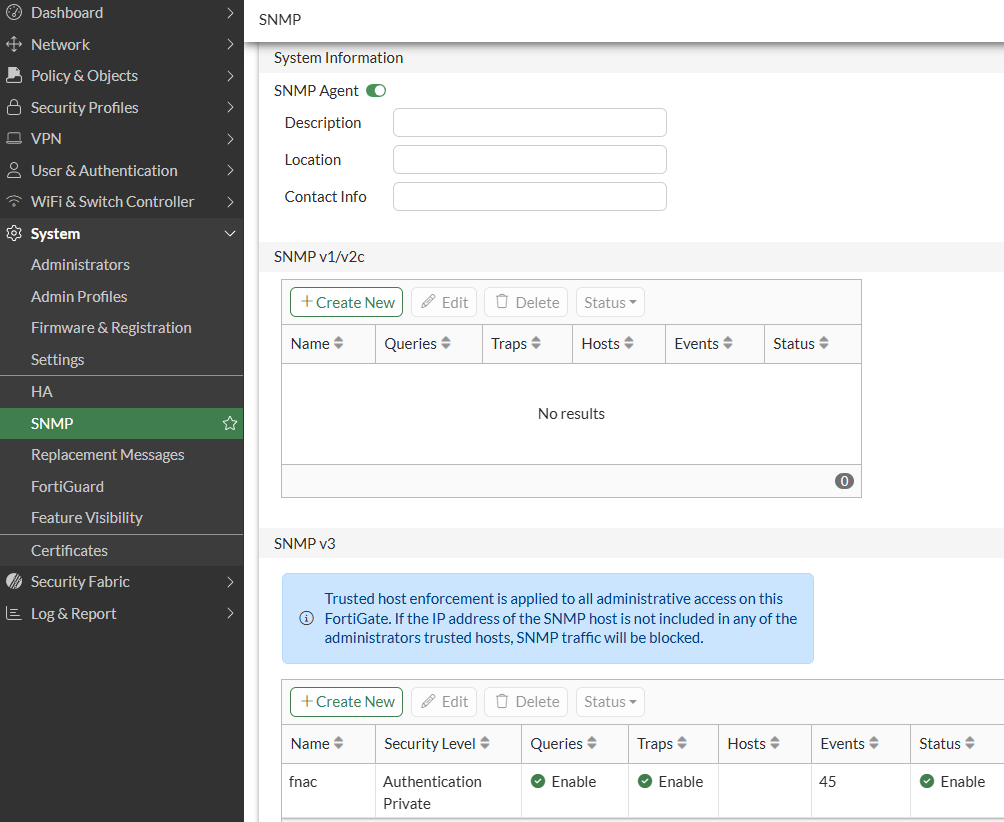
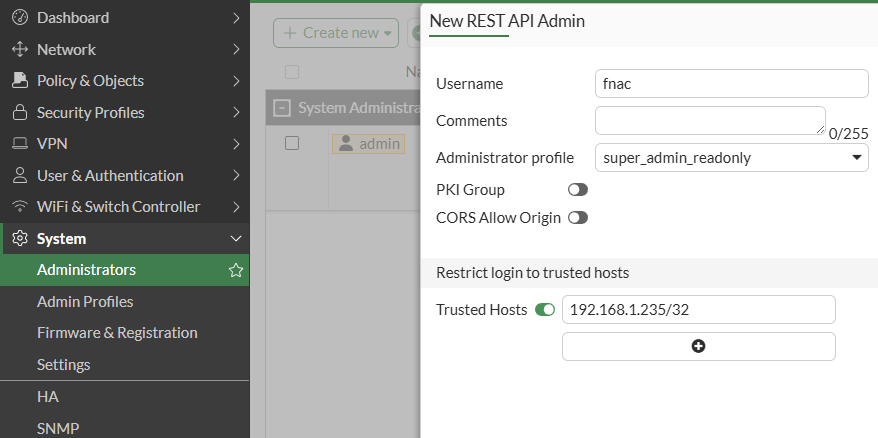
In FortiNAC, under Network -> Inventory, a container can be added, and devices can be placed inside it. I am adding the containers “Fortinet” and “Third-party”.
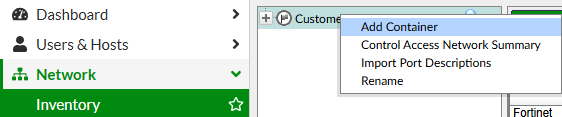
In this container, a device can be added using “Add”, and in my case, it's FortiGate, and I supply the IP, SNMPv3 information and the API key.
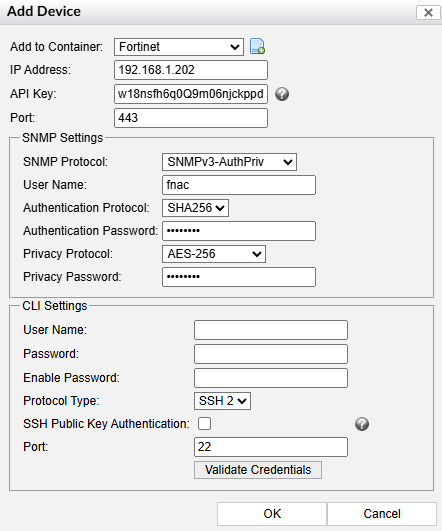
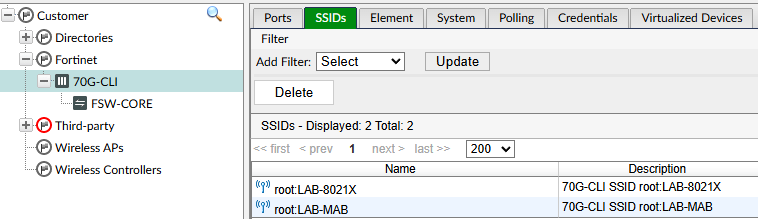
After validating the credentials and adding the FortiGate, the FortiSwitch should appear as a subdevice and the configured SSIDS should appear in the tab “SSIDs”.
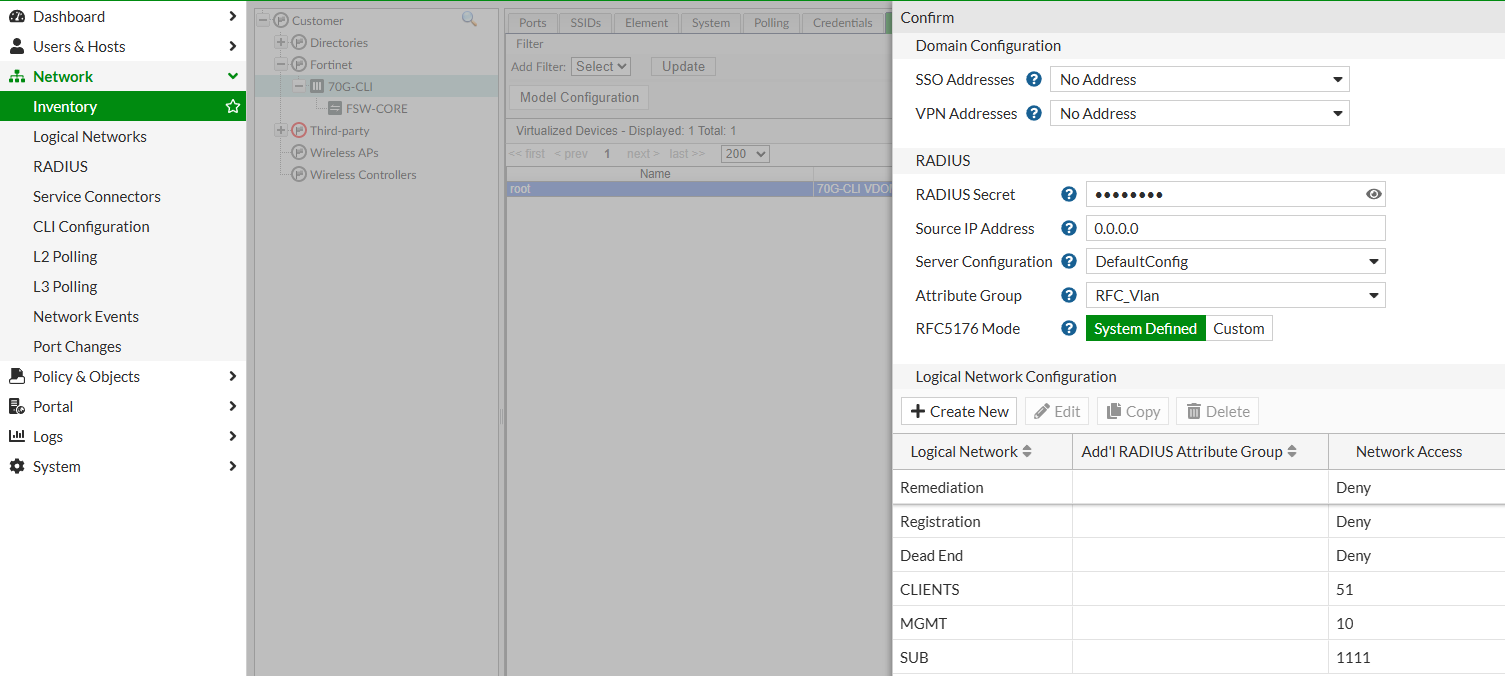
In the tab “Virtualized Devices”, the root VDOM can now be chosen, this is where the RADIUS as well as the logical network configuration can be set up.
A RADIUS secret is necessary to authenticate the connection between FortiNAC and FortiGate. In Server Configuration, the relevant virtual server can be chosen and set to Attribute Group RFC_Vlan.
Attribute Groups, configurable in Network -> RADIUS -> Attribute Groups in FortiNAC, say which RADIUS attributes will be returned to the switch or AP. The default groups are usually enough, but you may need more attributes or completely different ones.
In the section "Logical Network Configuration", VLAN IDs or names can be assigned to my logical networks, and these will be returned as RADIUS attributes after successful authentication.
After configuring all the necessary settings, click “Save” to save these changes.
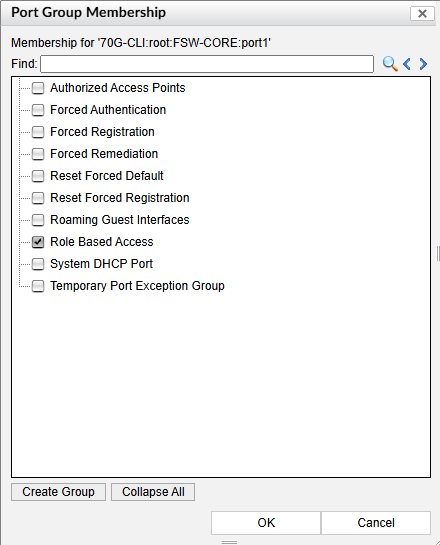
In FortiNAC, the FortiSwitch port where authentications should happen needs the correct Group Membership. Right-click on the port, or select several (then select “Add Ports to Groups”), a menu opens and “Role Based Access” can be selected, followed by confirming with OK.
In the tab „SSIDs“, it is important that 802.1X SSIDs have the option “Dot1x Auto Registration” or “Auto Registration” set to “On”. In Network Access, select "Use Inherited Network Access Policy from Virtual Device”.
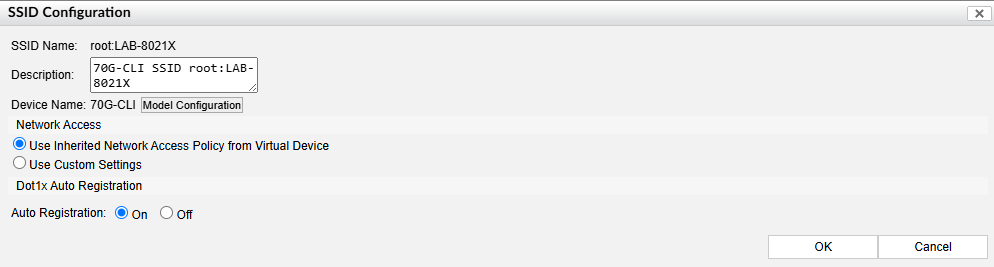
The Auto Registration option is important because FortiNAC classifies any new MAC address and the corresponding host as a so-called Rogue if there hasn’t been a registration or Device Profiling. This rogue may not authenticate on ports where enforcement is configured. This isn’t a problem for MAC authentication, because a host first needs to be assigned a role, and after that it is no longer a rogue.
On 802.1X authentication, it doesn’t make sense to manage hosts before an authentication, and that is why Auto Registration should be enabled, because then the rogue check is not performed.
The FortiGate is now correctly integrated, and we move on to third-party devices.
Model Devices: Third-Party
Like with the FortiGate, the third-party devices need an SNMP configuration so FortiNAC can integrate them. This configuration depends on the device and will not be covered here.
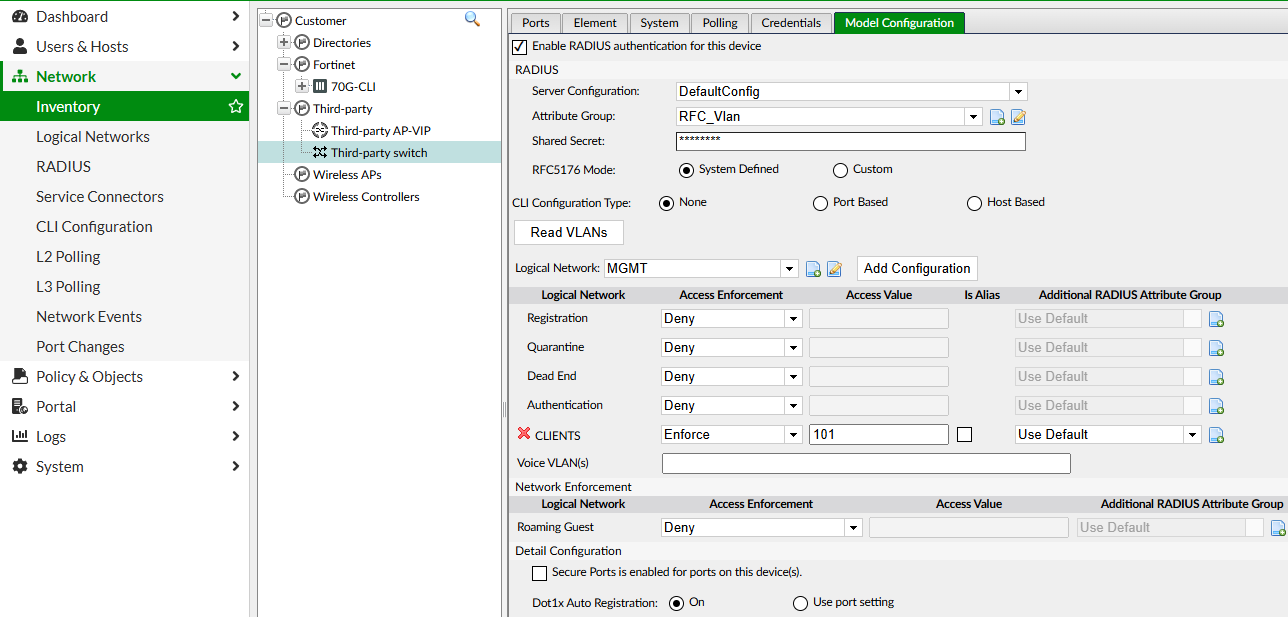
A switch will be the first device, and after adding it like a FortiGate using SNMP, the following changes can be made in “Model Configuration”:
- Enable RADIUS authentication for this device: Active
- Server Configuration: Select the correct RADIUS virtual server
- Attribute Group: RFC_Vlan or a different group
- Shared Secret: The RADIUS secret
- Read VLANs: Click on the button once
- Add the relevant logical networks using "Add Configuration".
For the logical networks, it is important that “Access Enforcement” is set to “Enforce” for each logical network and in “Access Value” the correct VLAN ID is selected.
The option Dot1x Auto Registration can be set globally here; otherwise it needs to be configured for each port.
After the model configuration is in order, it can be saved using “Save”.
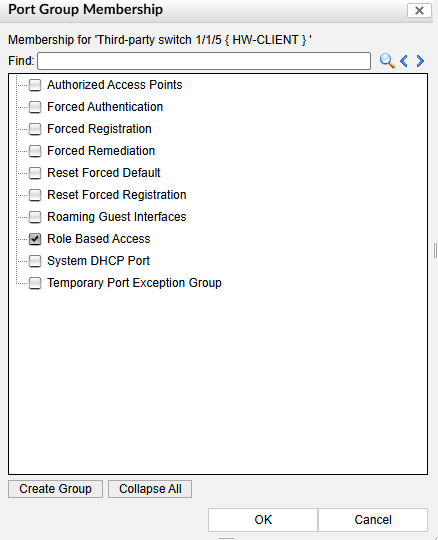
For the switch's ports, “Role Based Access” must be active for Group Membership.
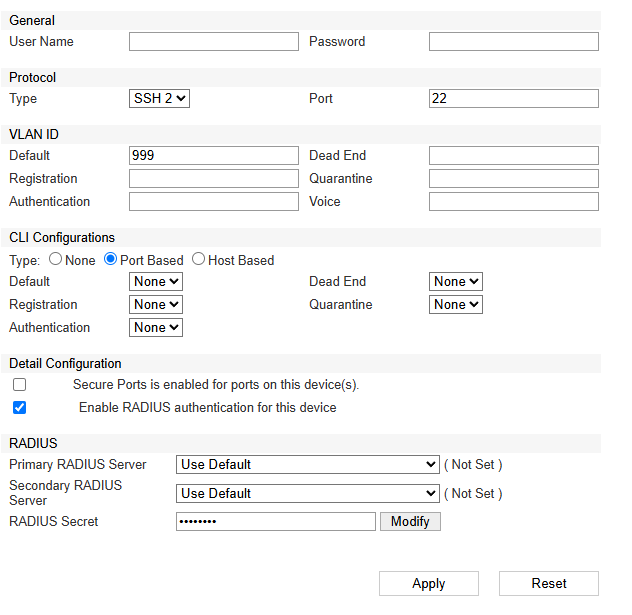
A default VLAN can also be assigned for the ports, which will be returned if the authentication fails.
To do this, right click on the device and select "Model Configuration" and enter a VLAN ID in the “Default” field.
For a third-party access point, the model configuration is very similar, but because it is an Aruba access point, I am returning the attribute group “Aruba_Role”, and Aruba roles as the access value are used, not VLAN IDs. On the access point, “VLAN Assignment Rules” are used to assign the roles to the correct VLANs. You can also activate “Dot1x Auto Registration“ for the entire device, but I will only activate it for the 802.1X SSID.
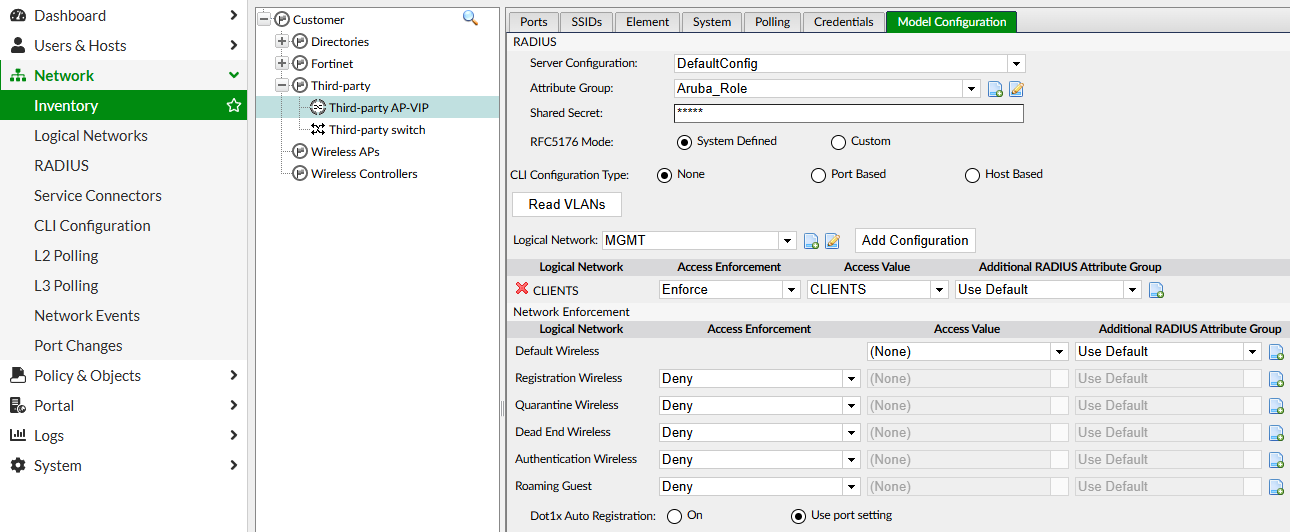
In the "SSIDs“ tab, the option "Use Inherited Network Access Policy from Device“ can be used if no exceptions are necessary. With a MAC authentication SSID, nothing else need to be done, but for an 802.1X SSID, “Auto Registration” should be re-enabled.
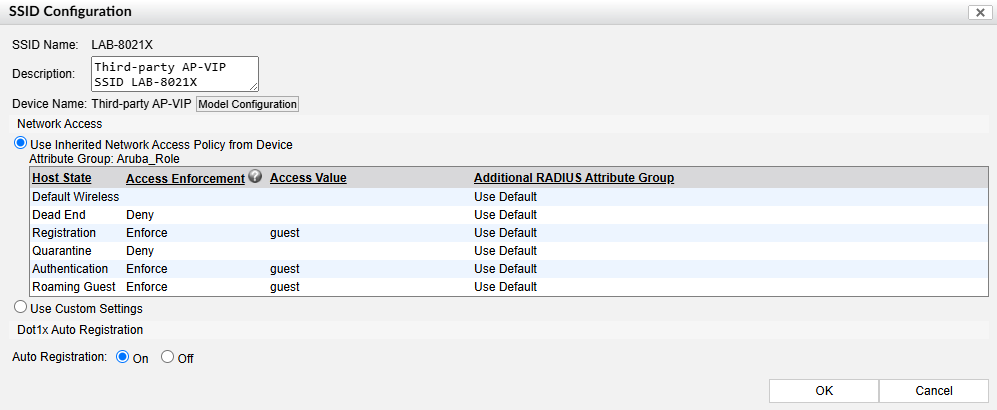
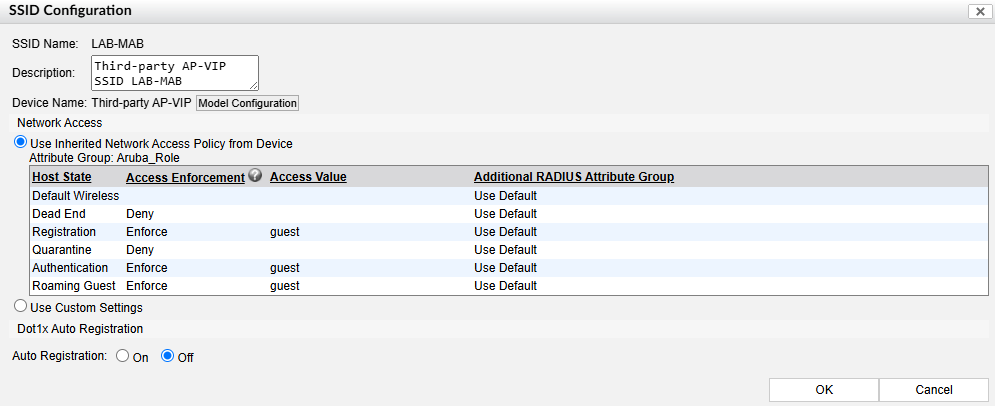
With this configuration, both the third-party switch as well as the access point are correctly configured on FortiNAC, and RADIUS can be configured on the devices. For third-party devices, this isn’t explained in this article.
FortiGate RADIUS configuration
To configure FortiNAC as a RADIUS server and use it for FortiSwitch and FortiAP, we first need to configure FortiNAC as a RADIUS server, which is done in User & Authentication -> RADIUS Servers.
Using “Create new”, a new entry can be created, and after supplying a name, IP/FQDN and secret (the same as on FortiNAC), the configuration can be saved.
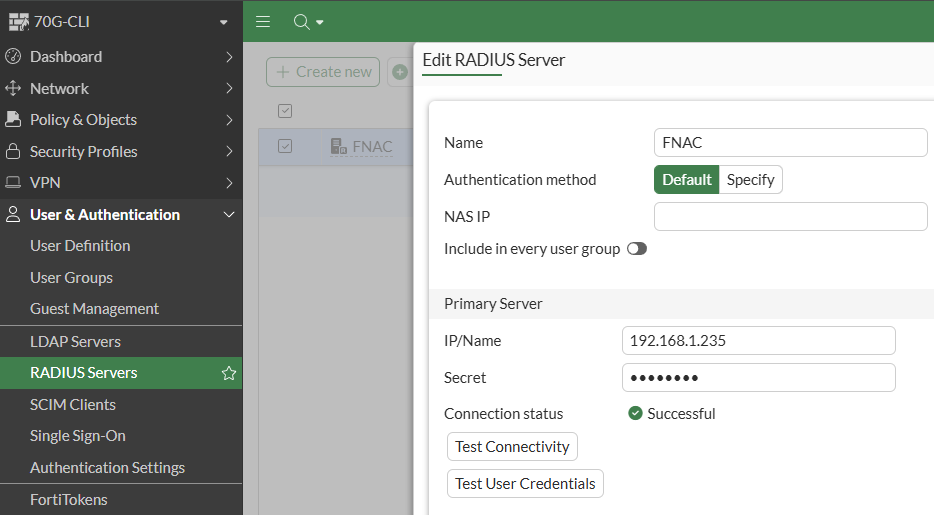
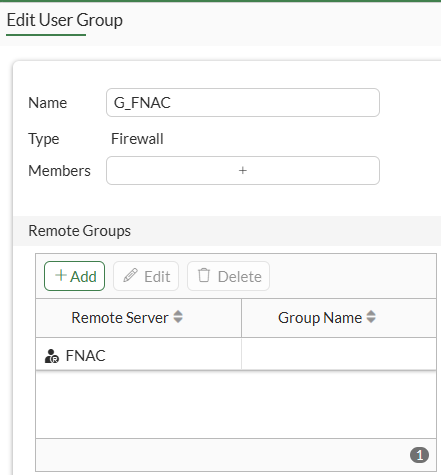
Next, a group with FortiNAC as a member must be created in User Groups.
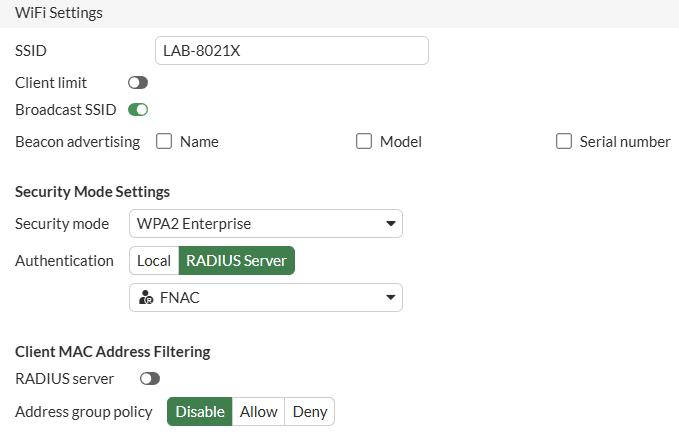
For FortiAPs, the tunnel SSID “Authentication” option must be changed to “RADIUS Server” and the RADIUS server must be selected. FortiAPs are now RADIUS-capable.
For FortiSwitches, a Security Policy is necessary, which is created in WiFi & Switch Controller > FortiSwitch Port Policies.
For 802.1X, configure the following:
- Security mode: Port-based
- MAC-based is also possible if multiple MAC addresses are expected on a port (telephones with a switch, access points, unmanaged switches, etc.).
- User groups: Choose the group with FortiNAC.
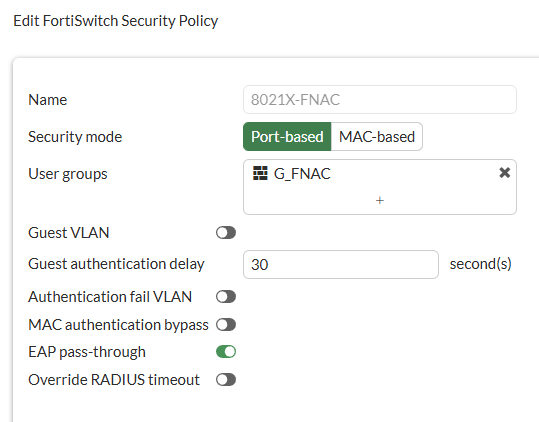
For a MAC authentication security policy, you also must enable the option “MAC authentication bypass”.
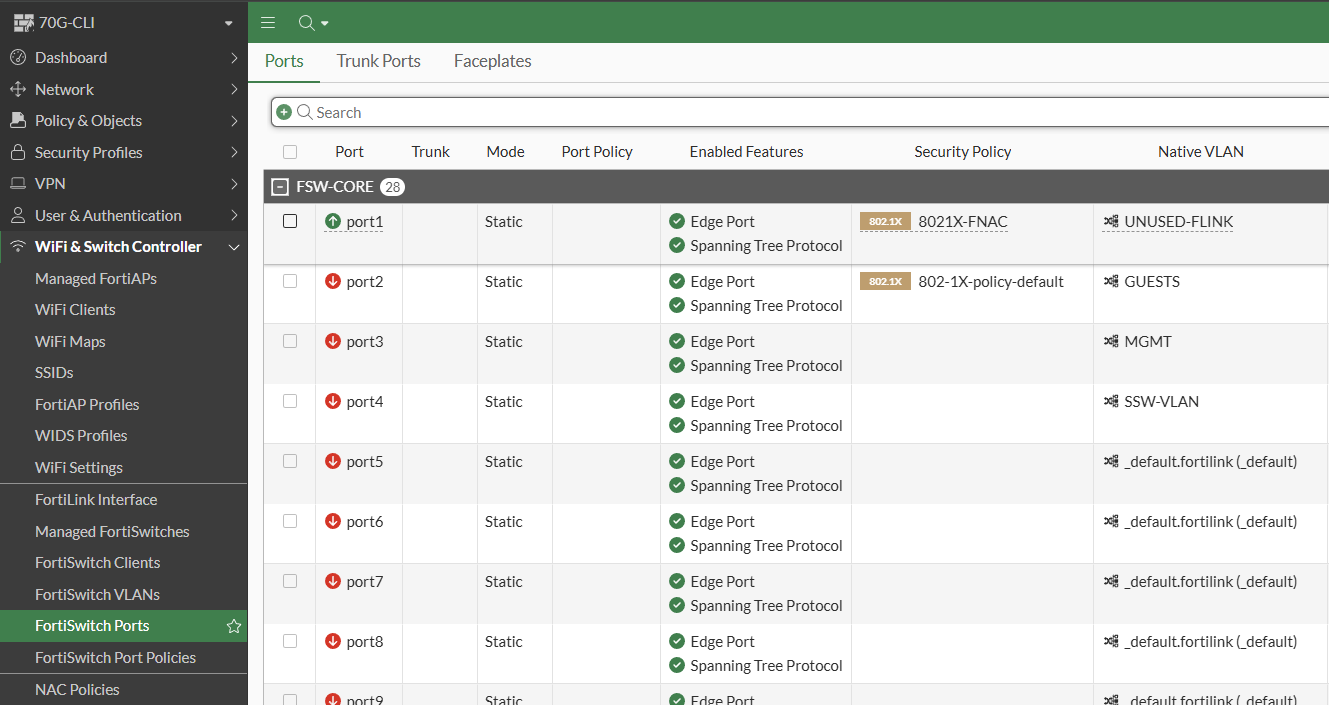
This security policy must then be assigned to a FortiSwitch port. For this, first enable the Security Policy column and then select the new security policy.
As a last step, the FortiLink interface needs a policy to FortiNAC, so RADIUS traffic is allowed by the FortiGate.
Important: The FortiLink interface can only be selected on the CLI as a source interface, so a different interface has to first be selected as the source interface.
NAT should be enabled in this policy.
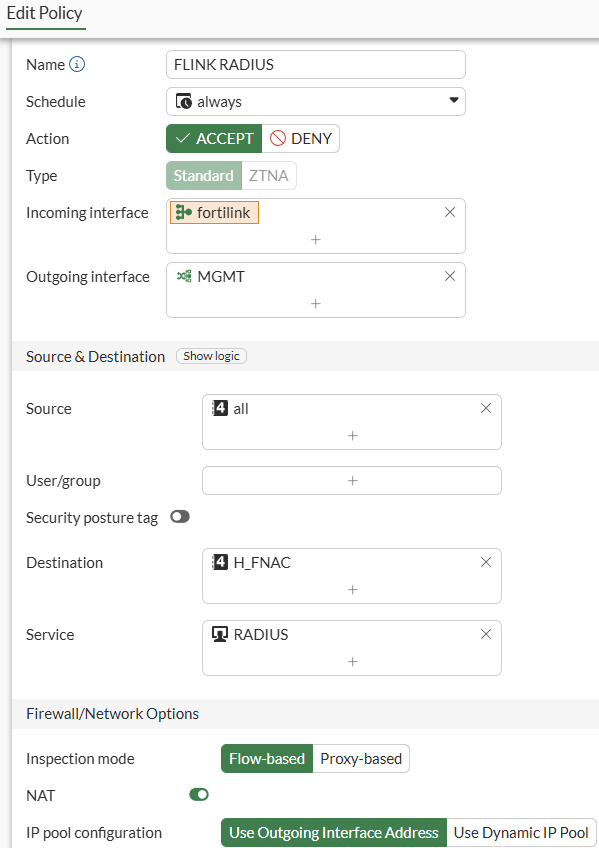
Now the Fortinet products are configured for RADIUS, and the configuration can be verified.
Verification of RADIUS authentication
First, the RADIUS Server Log should be opened in Network -> RADIUS -> View Logs -> Server Log.
Once a RADIUS authentication is sent to FortiNAC, regardless of FortiSwitch, FortiAP, or third-party, the log first displays the RADIUS request with the RADIUS attributes, which are used in the User/Host profile for filtering, the network access policy lookup, and at the end the result of the process, which are the RADIUS attributes FortiNAC sends to the device.
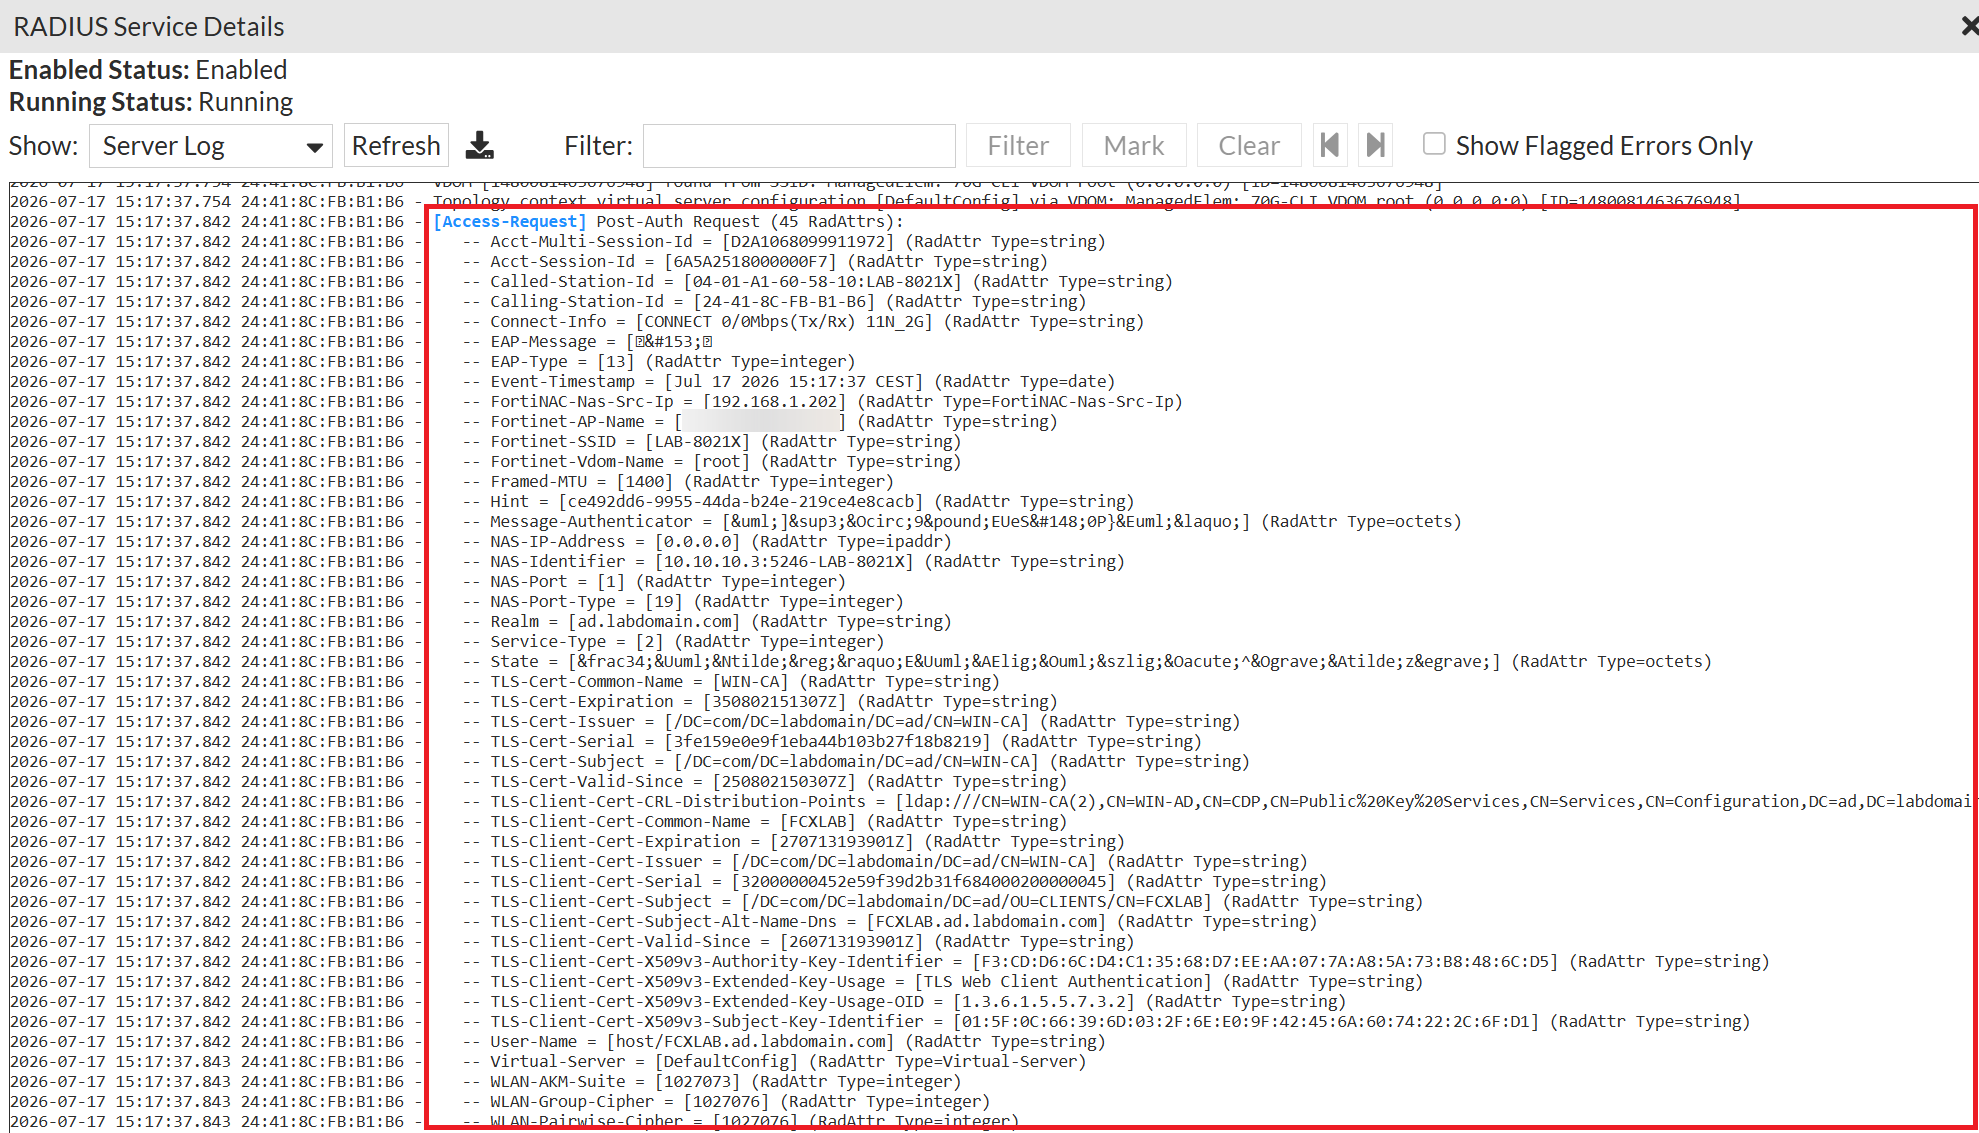
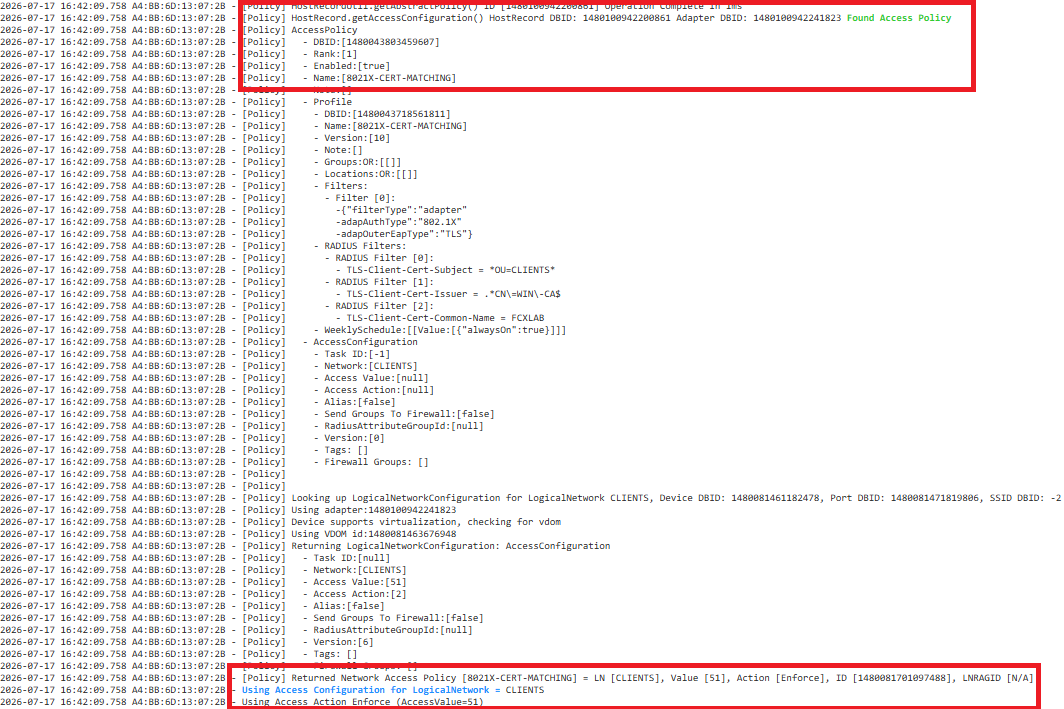
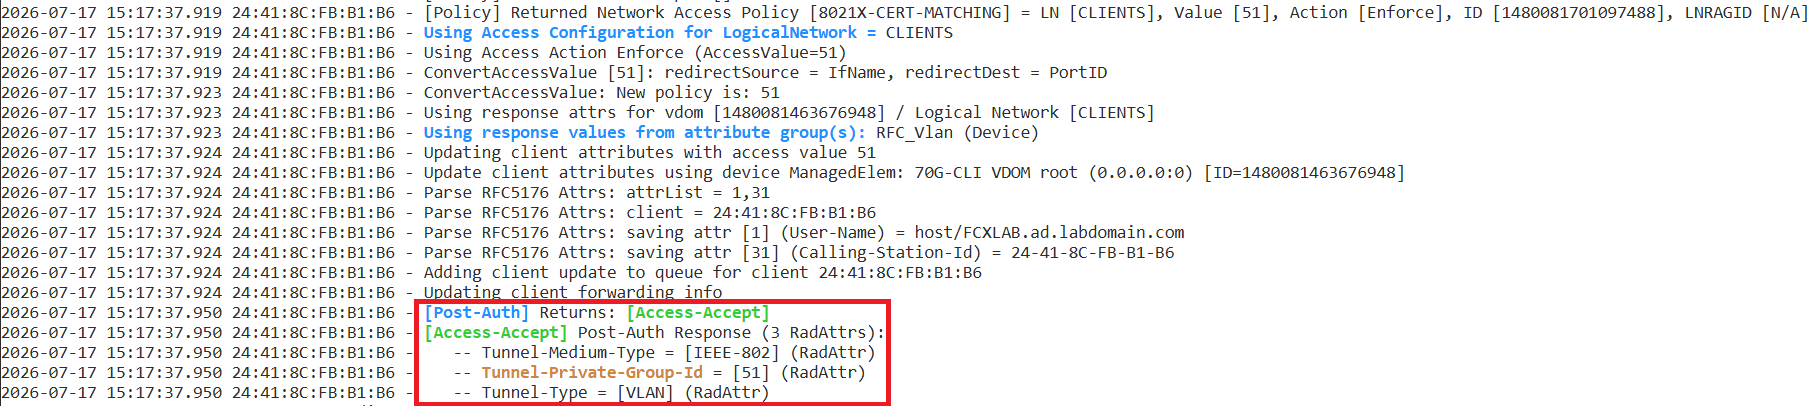
On a FortiSwitch, the status can either be checked using the GUI by looking at the “Dynamic VLAN” column or on the CLI using the command “diagnose switch-controller switch-info 802.1X <SERIAL_NAME> <PORT>“. One should see "state=AUTHENTICATED" and the correct "Native VLAN".
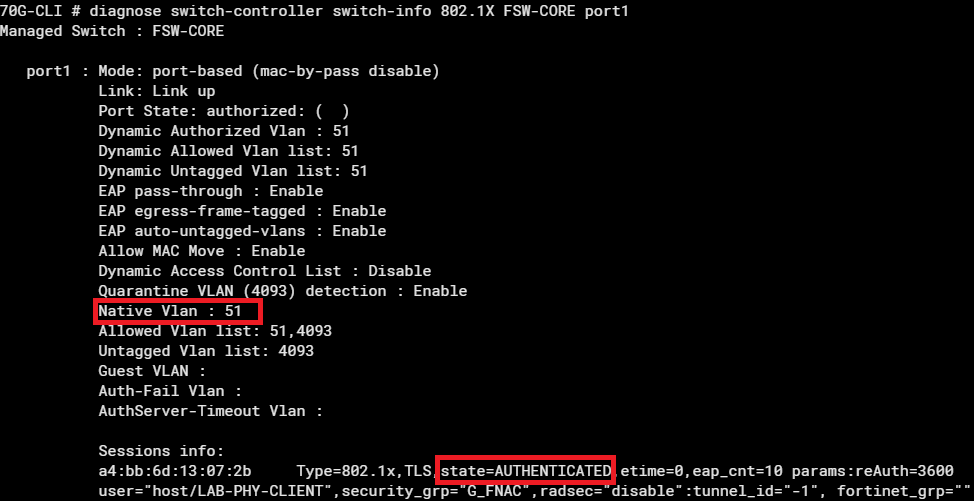
The verification on third-party devices is different from device to device and cannot be handled here.
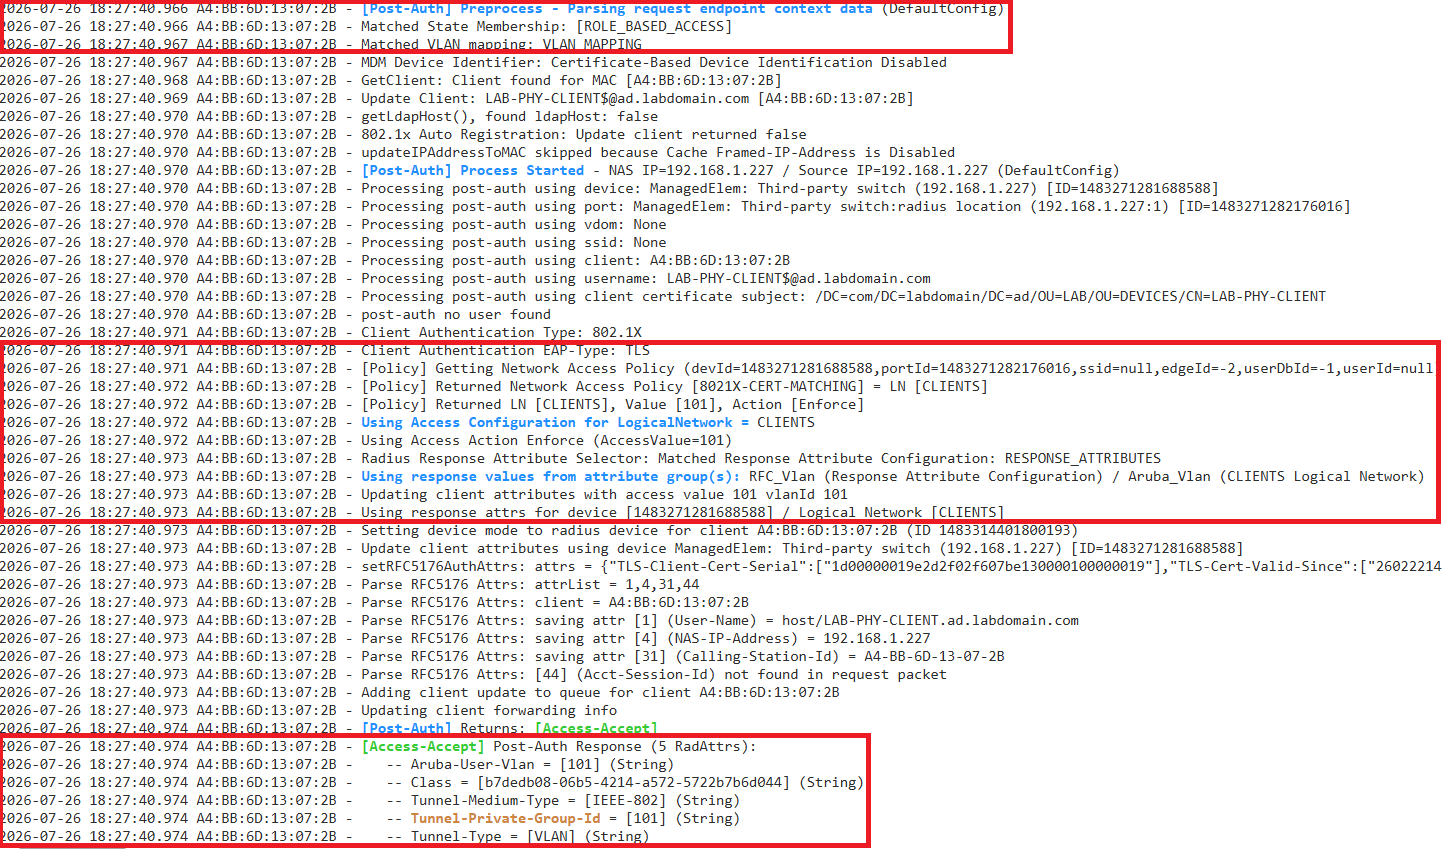
If FortiNAC returns at least the three RADIUS attributes Tunnel-Medium-Type, Tunnel-Private-Group-Id and Tunnel-Type, as can be seen in the picture above, then that should suffice in most situations.
Troubleshooting
Here are some of the most common errors that can happen during a RADIUS authentication. All errors appear in the RADIUS Server Log, and that is also the best option to find errors.
Policy access config lookup skipped - not a member of 'Role Based Access' port group: The port on which a client is connected is not a member of the group “Role Based Access”. For 7.6.7, the State Based Access Control Rules change has to be made, which is explained in the 7.6.7 section.
[Access-Reject-Event] - Eap-DefaultConfig: Failed continuing EAP TLS (13) session. EAP sub-module failed/[Access-Reject-Event] - Client Certificate Not Trusted (Unknown CA): The CA certificate was not imported as a Trusted Certificate for „RADIUS Endpoint Trust [radius]“, as was explained in “Importing certificates”.
Skipping Enforcement Action - Rogue Client on NON Forced Registration Port (Group: Forced Registration): The client is a rogue, meaning the MAC address isn’t registered. With MAC authentication, a role has to be assigned. For 802.1X authentication, „Dot1x Auto Registration“ should be enabled in either the Model Configuration or on the port.
Get Enforcement Action - Rogue Client on Registration Enforced SSID: Much like the previous error, but for SSIDs instead of ports.
[Policy] No Network Access Policy match found: None of the existing Network Access Policies could be matched. The existing policies, or rather the User/Host profiles, must be cross-checked with the attributes of the RADIUS request.
Session Close
But wait! I promised 7.6.7, and that comes now.
RADIUS-Only with FortiNAC 7.6.7
Integrating devices only using RADIUS and without SNMP is a fantastic new feature of 7.6.7, and the steps to configure it aren’t that complicated, but there are a few things that are important.
Important: Logical Networks, User/Host Profiles and Network Access Policies as well as Configurations are still needed, and this configuration doesn’t change for RADIUS-only devices.
In Network -> Configuration, a few old menus have been combined, and new ones have appeared.
In the "Settings" tab of the “RADIUS” menu, the settings should be checked if there is an existing configuration or not, especially the Authentication Port, which may be 1645 on new installations instead of the standard 1812.
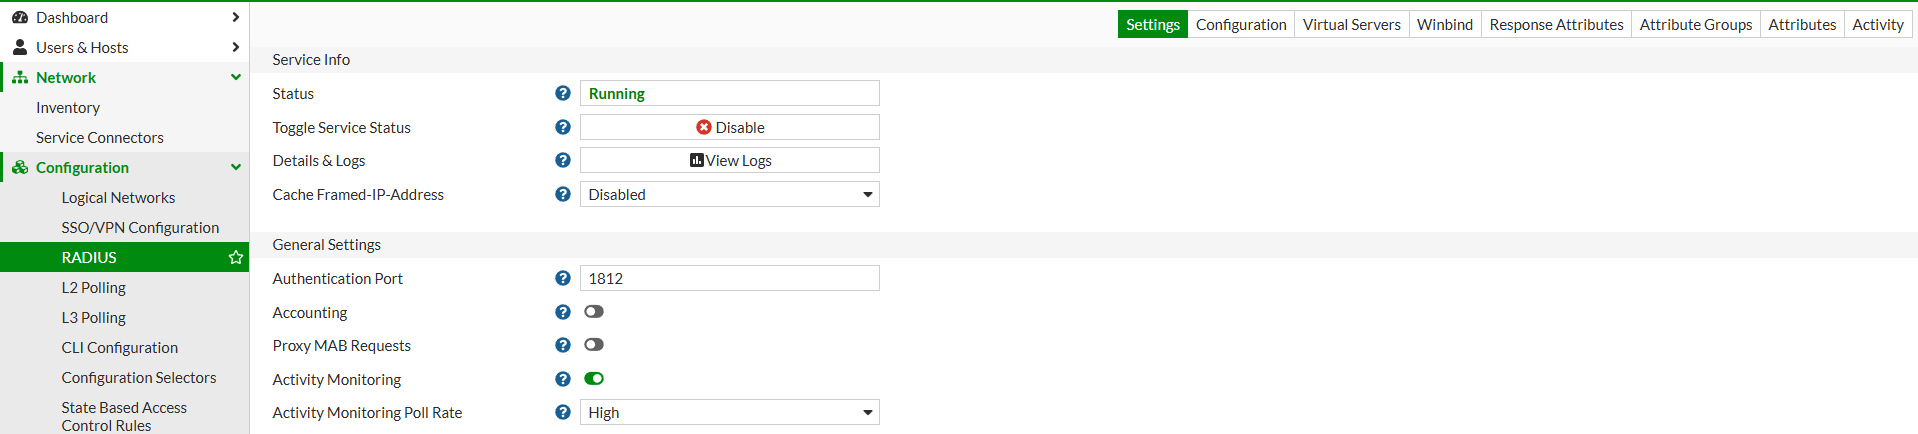
But first, a RADIUS-only device must be added, and that happens, as previously, in Network -> Inventory using “Add”. Here, the new option “RADIUS Settings” can be selected and the RADIUS secret may be entered. The secret, the IP, and a container are everything that is needed.
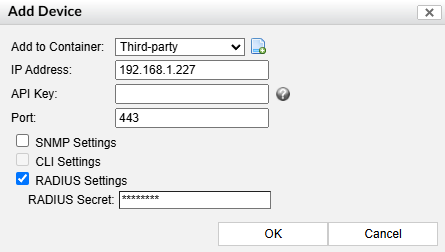
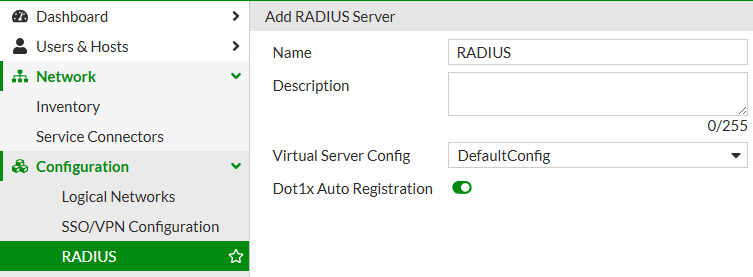
RADIUS with 7.6.7
For RADIUS-only, we need a RADIUS Configuration, which is found in Network -> Configuration -> RADIUS in the "Configuration“ tab. Here, a new configuration can be added. For that, a Virtual Server is needed, and Dot1x Auto Registration can be enabled for the configuration.
In the same menu, but on the “Response Attributes” tab, a configuration must be created that determines which RADIUS attributes will later be sent to the device. In the field „Authentication“, a global attribute group can be selected, which always gets sent. Using “Add New”, each logical network can send additional attribute groups.
As an example, I am returning “RFC_Vlan” and for the logical network “CLIENTS”, the group “Aruba_Vlan”. Except for the global authentication attribute group, no configuration is necessary, except when you need additional RADIUS attributes.
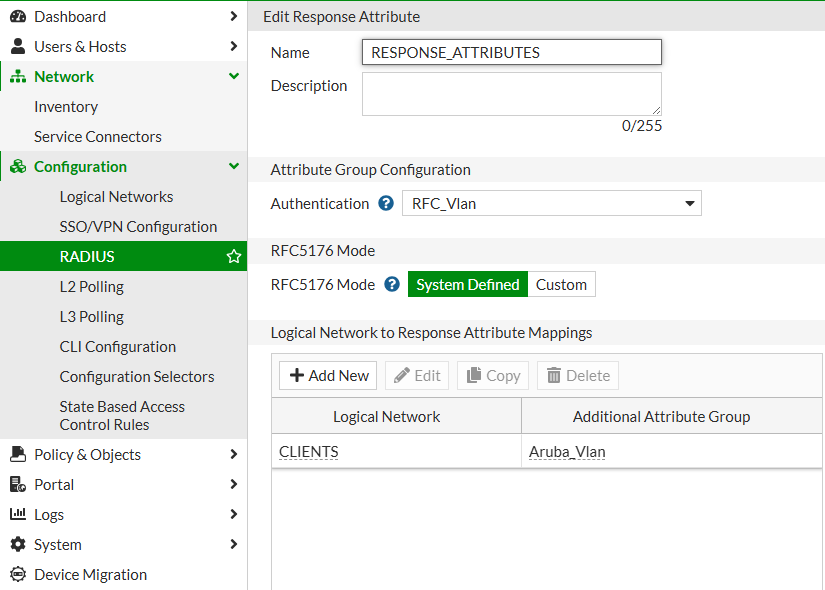
As a last step, before we begin with the real logic, we must assign VLAN IDs to logical networks.
Logical Networks, in 7.6.7, are created in Network -> Configuration -> Logical Networks using the tab „Logical Networks“, and the configuration is as explained above; the mapping happens on the tab “Logical VLAN Mapping Configuration”.
Here, a configuration is created that assigns an Access Value, meaning a VLAN ID, to each logical network.
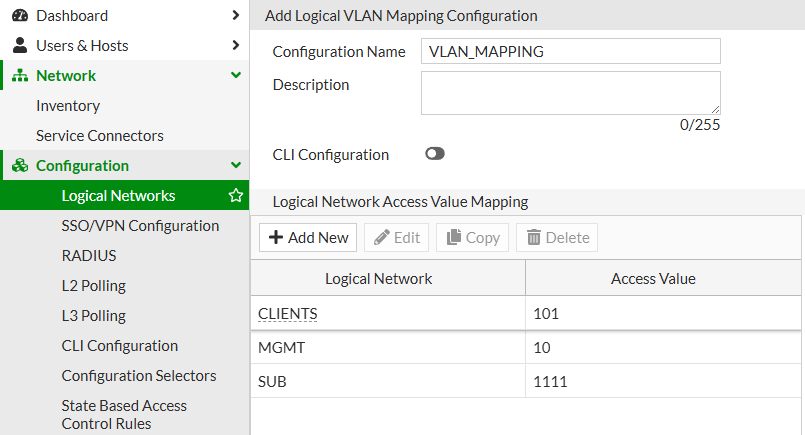
Now we can turn to Selectors.
Configuration Selectors and Control Rules
The new Configuration Selectors determine which RADIUS, attribute, and VLAN configuration will be used, based on specific filtering rules.
You can find these in Network -> Configuration -> Configuration Selectors, and the three most important tabs are:
- RADIUS Server Selector
- Response Attribute Selector
- Logical VLAN Mapping Selector
The names are not unknown to us, because we have just configured these objects. In each section, a new entry must be created that determines which device will use which Target Configuration. For filtering, you can use RADIUS, device-relevant, container, and port and SSID attributes.
You can configure that specific SSIDs (RADIUS; Fortinet-SSID), a device with a specific IP (Device; Device IP Address), in a specific container (Container; Container Name) or on a specific port (Port and SSID; Port Name) get a specific configuration.
In all selectors, I filter on the container “Third-party”, selected from the inventory. You can, of course, add AND and OR conditions to use the configuration for more containers.
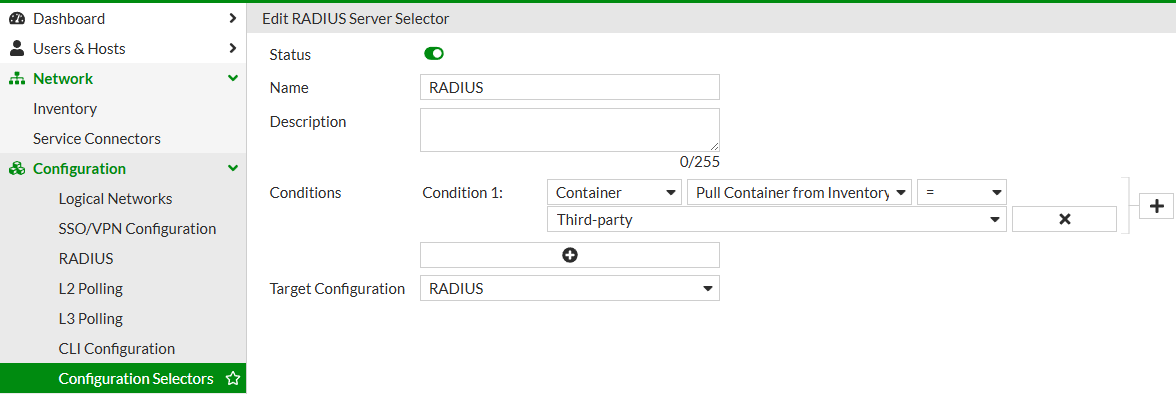
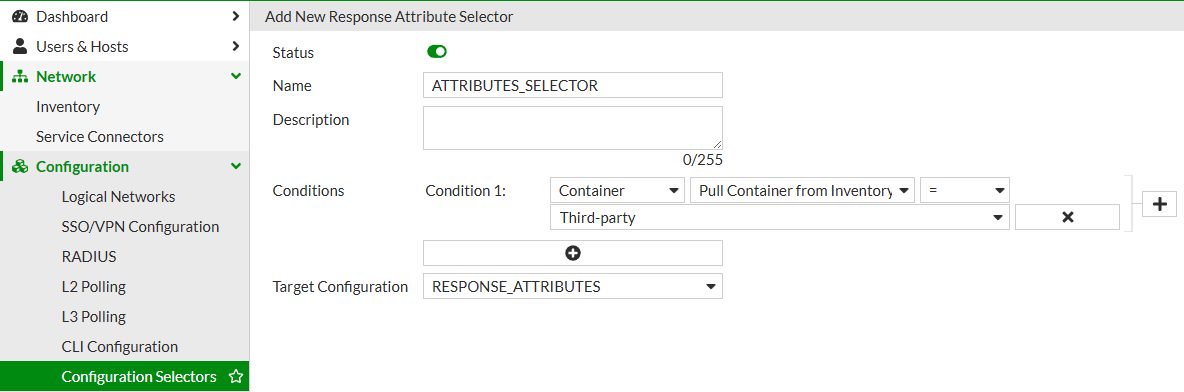
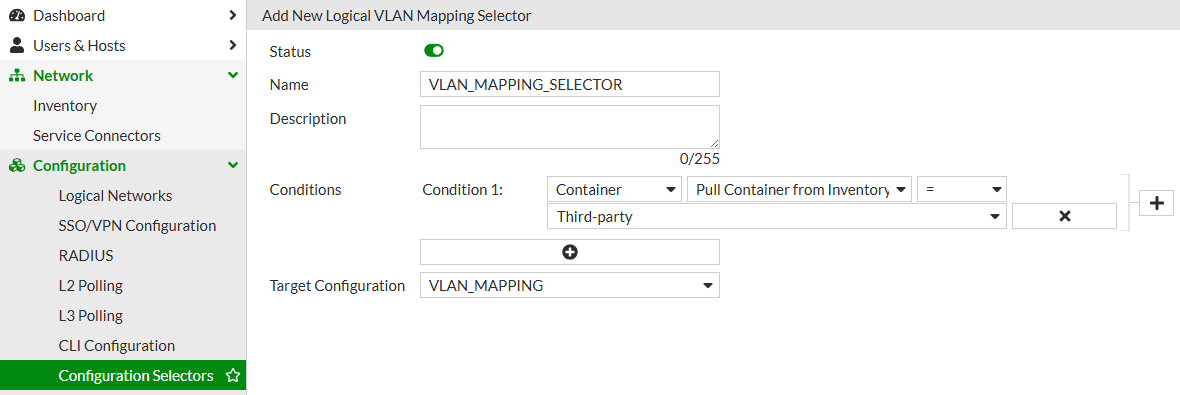
As a last step, we must, in Network -> Configuration -> State Based Access Control Rules, change the entry with the "Membership Actions“ "Role Based Access“.
Here, an additional OR condition with "Port and SSID Port Port Group != Legacy Role Based Access“ must be created.
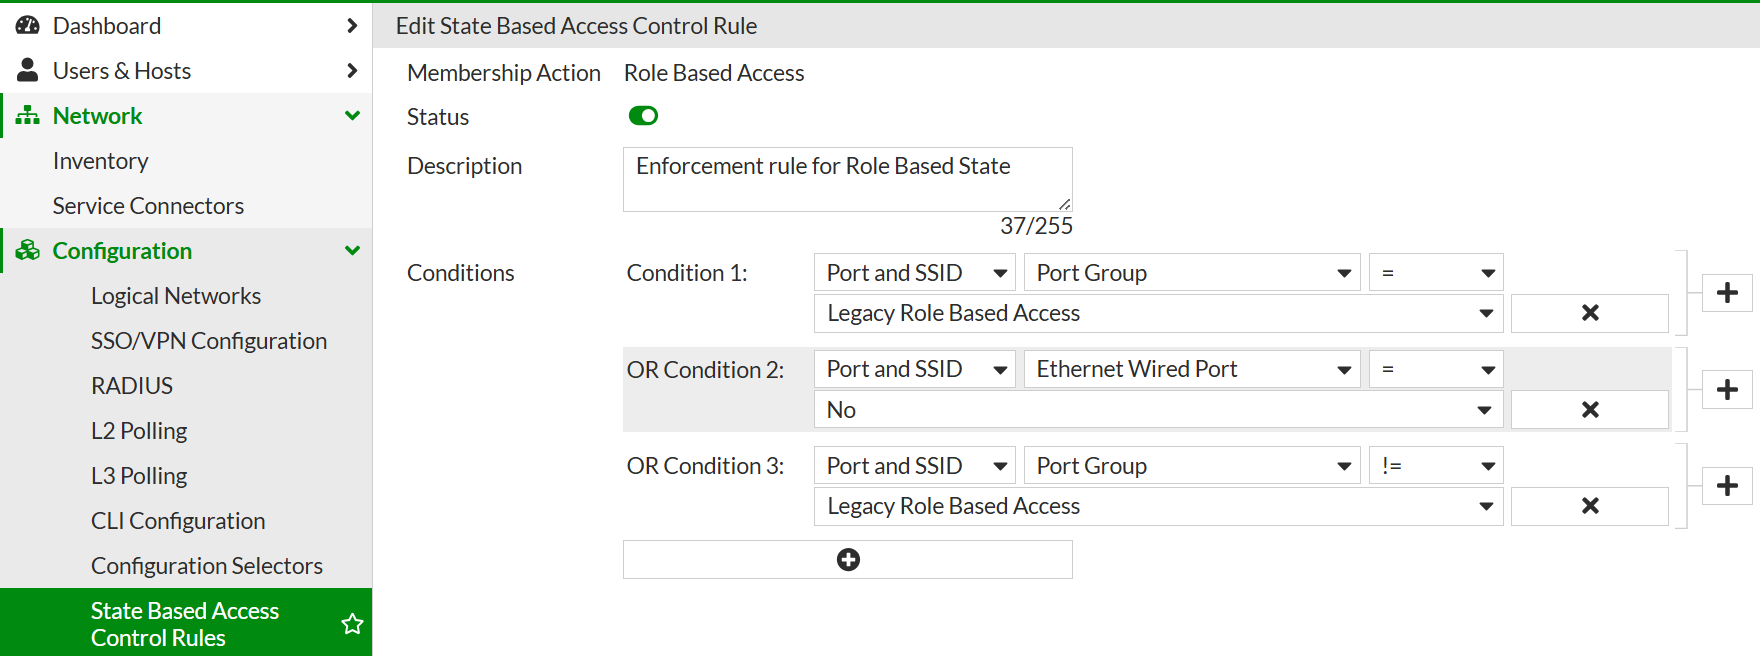
These conditions are needed to later select the network access policy for enforcement, but with the default configuration there is a problem for RADIUS-only devices. These devices don’t have port groups, so no network access policy would ever be searched for. With this small change, this works, and old SNMP devices can co-exist with new RADIUS-only devices.
Verification with 7.6.7
The test is the same as with 7.6.6, so once an 802.1X client connects on a switch, you can see the following in the RADIUS Server Log:
- The RADIUS Server „DefaultConfig“ will be chosen using the RADIUS Server Selector.
- The State Membership is, according to the State Based Access Control Rules, “ROLE_BASED_ACCESS”.
- VLAN mapping „VLAN_Mapping“ is chosen using the Logical VLAN Mapping Selector.
- The Network Access Policy “8021X-CERT-MATCHING” with the Logical Network “CLIENTS” and VLAN ID 101 is selected.
- The Response Attribute “RESPONSE_ATTRIBUTES” is chosen using the Response Attribute Selector.
- The „RFC_Vlan“ Attribute Group is returned as the global Attribute Group, and because the Logical Network „CLIENTS“ was chosen, the Attribute Group „Aruba_Vlan„ (Attribute „Aruba-User-VLAN“) is also returned.
With this, RADIUS-only is also configured.
As mentioned above, there are no changes to network access policies, so if there are existing policies, these can be reused.
Session Close and now for real
FortiNAC is a powerful product, and in this article only parts of the features were described. There is so much more that FortiNAC can do, but, dear dearer, that is for articles for the future. In the meantime, I hope this article regarding RADIUS authentication helps.
If you have suggestions for future posts, would like to see configurations, also in video format, or want to give feedback, please send it to techxperts_central @exclusive-networks.com.
Latest blogs
View all BlogsFeatured
Blogs
Beyond Refurbished: Why Trust Is Becoming the Real Value Driver
Featured
Blogs
FortiNAC as RADIUS server for wired/wireless 802.1X/MAC auth
Featured
Blogs
Building AI Security That Actually Works: A Technical Deep Dive into F5 AI Guardrails and AI Red Team
Featured
Blogs
The AI Adoption Paradox: Why Your Biggest Opportunity Is Also Your Biggest Risk
Featured
Blogs
Falcon Adversary OverWatch: Stop hidden threats with 24/7 expert threat hunting
Featured
Blogs

