




10 Jul 2026


One of the challenges you have to solve when migrating from an old switching infrastructure to a FortiLink configuration with FortiSwitches are the VLANs. They are usually connected to the old core switch, but are much better off on a FortiLink interface.
Today, we will look at the best ways to migrate these VLANs, diving into two methods.
The setup
- FortiGate 70G on 7.6.7
- FortiSwitch 424E on 7.6.6
- Third-party switch (Core switch)
An LACP-based LAG is configured between the FortiGate and the third-party core switch, and a FortiLink interface is used to connect the FortiSwitch.
The third-party LAG already has VLANs configured with gateway IP addresses. No additional VLANs are configured on the FortiLink interface other than the default ones.
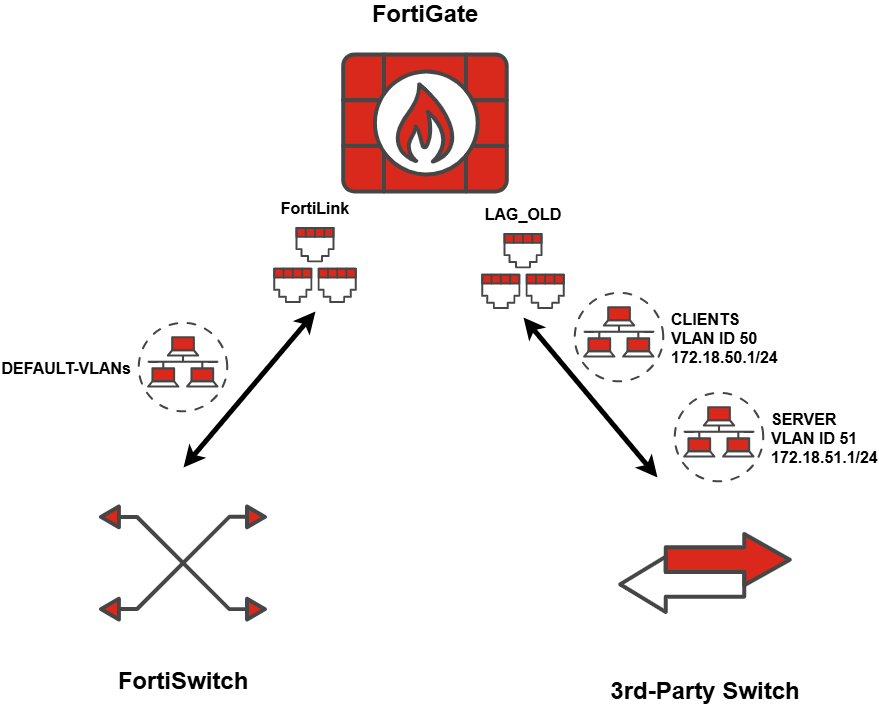
Method 1: Configuration restore with reboot
With this method, you download the FortiGate configuration, edit it offline, and upload the new configuration via a restore.
This method works because every VLAN interface is linked to a physical interface. If you change the physical interface, the VLAN interface moves along with it.
config system interface
edit "SERVER"
set vdom "root"
set ip 172.18.50.254 255.255.255.0
set interface "LAG_OLD" ---> set interface "fortilink"
set vlanid 50
next
edit "CLIENTS"
set vdom "root"
set ip 172.18.51.254 255.255.255.0
set interface "LAG_OLD" ---> set interface "fortilink"
set vlanid 51
next
end
After you have changed the interface of all VLAN interfaces to the FortiLink interface in the downloaded configuration, you can perform a restore.
The disadvantage here is that a restore triggers a reboot, so there will be some downtime. If this is no problem, this method is an easy way to handle this challenge. If you want to keep the downtime to a minimum then the next method might be better.
Once the restore has been completed, all physical connections to the switches can be migrated, which is another bit of downtime you have to consider.
Method 2: Layer 2 connection with new VLAN interfaces
This method involves the following steps:
- All VLANs that exist on the old switching infrastructure are recreated on the FortiLink interface
- These VLANs have the same IDs, but different names
- Except for the IP and other layer 3 configurations, e.g. DHCP, everything can be pre-configured
-
The FortiLink VLANs will be associated with the same firewall policies currently applied to the existing VLANs
-
- If zones are already in use, this can be done quickly
- If no zones are used, you can start setting them up now
- The Multiple Interface Policies feature is a great help here
3. A layer 2 connection and a trunk are established between the old and new switching infrastructure so that VLANs can be transferred

4. Port connections can be migrated to the FortiSwitch one by one
5. When the layer 3 configuration (IPs, DHCP, etc.) needs to be migrated, this can be done using a pre-built script
-
An example of a migration script with 2 VLANs can look like the following (the IP information of the DHCP server is included for reference and can otherwise be ignored; only the interface is relevant):
config system interface
edit "SERVER"
unset ip
set interface "LAG_OLD"
next
edit "SERVER-FLINK"
set ip 172.18.50.254 255.255.255.0
set interface "fortilink"
next
edit "CLIENTS"
unset ip
set interface "LAG_OLD"
next
edit "CLIENTS-FLINK"
set ip 172.18.51.254 255.255.255.0
set interface "fortilink"
next
end
config system dhcp server
edit 50
set default-gateway 172.18.50.254
set interface "SERVER-FLINK"
config ip-range
edit 1
set start-ip 172.18.50.1
set end-ip 172.18.50.253
next
end
next
edit 51
set default-gateway 172.18.51.254
set interface "CLIENTS-FLINK"
config ip-range
edit 1
set start-ip 172.18.51.1
set end-ip 172.18.51.253
next
end
next
end
A few points are worth mentioning regarding Method 2:
- The same VLAN IDs can exist on different physical interfaces, but not the same one
- The new VLANs need a different name from the old ones
- Spanning Tree between the old and new infrastructures needs to be taken into account
- There is a downtime at layer 3, because the IPs are now attached to new MAC addresses, so ARP needs to do its thing first
- The layer 2 connection and configuration should be tested before the migration
With this method, everything can be prepared and tested in advance and on the day of the migration, you only have to take care of the layer 3 configuration, which creates a short downtime.
Wrapping Up
The two methods presented here will get the job done, they mostly differ on the expected downtime and timeframe of the method chosen.
We hope the information here will help you with your next switch migration.
If you have suggestions for future posts, would like to see configurations, also in video format, or want to provide feedback, please send them to: techxperts_central@exclusive-networks.com.
Latest blogs
View all BlogsFeatured
Blogs
Beyond Refurbished: Why Trust Is Becoming the Real Value Driver
Featured
Blogs
FortiNAC as RADIUS server for wired/wireless 802.1X/MAC auth
Featured
Blogs
Building AI Security That Actually Works: A Technical Deep Dive into F5 AI Guardrails and AI Red Team
Featured
Blogs
The AI Adoption Paradox: Why Your Biggest Opportunity Is Also Your Biggest Risk
Featured
Blogs
Falcon Adversary OverWatch: Stop hidden threats with 24/7 expert threat hunting
Featured
Blogs

